Unicorns are often portrayed as white wild horses with one spiral horn possessing magical abilities. Only the pure of heart could get near them, and the unicorns would fall asleep in their laps.
SIZE:
A Unicorn from this pattern is 12 in/30 cm tall from head to hoof (14 in/35.5 cm tall including the horn), 8 in/20.5 cm long from nose to rump, 3 in/7.5 cm wide from shoulder to shoulder.
MATERIALS
- Yarn: See table on page 220 to choose the options you will make for your Unicorn and find the yarn amounts needed for each piece. All yarn is #4 medium/worsted weight except for the Advanced Spiral Horn, which is doubled lace or sock (#0 or #1) yarn, and all yarn amounts are approximate.
Main Color: 179 yd/163.75 m
Hoof Color: 8 yd/7.25 m
Horn Color: 4 yd/3.75 m for Simple Horn, 13 yd/12 m for Advanced Spiral Horn
Accent Color: 226 to 255 yd/206.75 to 233.25 m (depending on mane and tale options)
- US size C (2.75 mm) crochet hook (for Advanced Spiral Horn only)
- US size G (4 mm) crochet hook
- 18 mm safety eyes
- Optional: Glass gems for weighted feet
- Fiberfill stuffing
- Darning needle
- Pins
- Scissors
- Duct tape
- Wire strong enough to support posing.
Recommend 5 pieces of 18-in/46-cm, 18-gauge, paper-wrapped wire (found in the faux floral arrangement section of any craft store; if this exact wire cannot be found, please use 14- to 16-gauge wire—err on the side of heavier wire) - Pliers
INSTRUCTIONS
Look at the Gallery on the next page and the chart below to determine the pieces you want to make for your Unicorn. You have two options each for the Mane, tail, and horn. The Unicorn is assembled as you go.
Use US size G (4 mm) hook for all parts except the Advanced Spiral Horn.
| PARTS TO MAKE | NUMBER TO MAKE | YARN COLOR | APPROX. AMOUNT |
| Unicorn Front Leg | 2 | Main Color, Hoof Color | 32 yd/29.25 Main Color, 4 yd/3.75 m Hoof Color for 2 legs |
| Unicorn Rear Leg | 2 | Main Color, Hoof Color | 46 yd/42 m Main Color, 4 yd/3.75 m Hoof Color for 2 legs |
| Unicorn Body | 1 | Main Color | 51 yd/46.5 m |
| Unicorn Neck | 1 | Main Color | 35 yd/32 m |
| Unicorn Head | 1 | Main Color | 15 yd/13.75 m |
| Mane: Choose 1 of the following | |||
| Unicorn Puffy Cloud Mane | 1 | Accent Color | 135 yd/123.5 m |
| Unicorn Ruffle Wavy Mane | 1 | Accent Color | 110 yd/100.5 m |
| Tail: Choose 1 of the following | |||
| Unicorn Puffy Cloud Tail | Accent Color | 116 yd/106 m | 116 yd/106 m |
| Unicorn Ruffle Wavy Mane | 1 | Accent Color | 120 yd/109.75 m |
| Horn: Choose 1 of the following | |||
| Unicorn Simple Horn | 1 | Horn Color | 4 yd/3.75 m |
| Unicorn Advanced Spiral Horn | 1 | Horn Color in doubled lace or sock yarn | 13 yd/12 m |
Gallery
| Unicorn with Ruffle Wavy Mane and Tail, Advanced Spiral Horn | Unicorn with Ruffle Wavy Mane and Tail, Advanced Spiral Horn |
 |  |
| Unicorn with Puffy Cloud Mane and Tail, Advanced Spiral Horn | Unicorn with simplified Ruffle Wavy Mane and Tail, Simple Horn, and Phoenix Wings |
 |  |
UNICORN PARTS
ATTERNS
UNICORN FRONT LEG (MAKE 2)
Optional: You can make the hooves in an accent color yarn (approximately 4 yd/3.75 m).
Optional: 2 pieces of 18-in/46-cm, 18-gauge, paper-wrapped stem wire, or alternative that is strong yet moldable.
With US size G (4 mm) crochet hook:
- Optionally start with the Hoof Color yarn, SC 6 in Magic Circle, SI St to beginning stitch, Ch 1 [6]
- Inc x 6, SI St to beginning stitch, Ch 1 [12]
- BLO [SC 6, HDC 6], SI St to beginning stitch, Ch 1 [12]
- SC 6, HDC 6, SI St to beginning stitch, Ch 1 [12]
| If you started with the Hoof Color yarn, switch to the Main Body Color yarn here. |
- SC 2, Dec, SC 8, SI St to beginning stitch, Ch 1 [11]
- SC, 2 Dec in 3 SC, SC 7, SI St to beginning stitch, Ch 1 [10]
- SC, Dec, SC 7, SI St to beginning stitch, Ch 1 [9]
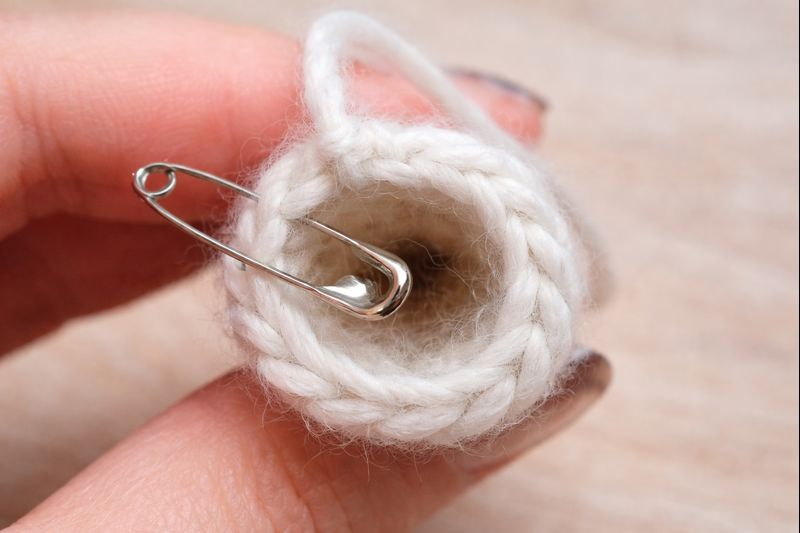
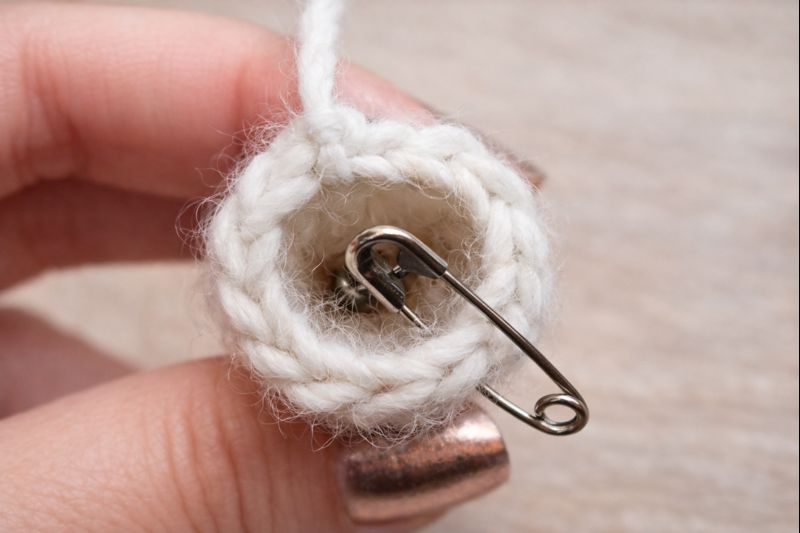
NOTE: At this point, you can take one wire and bend the end of it into a circle the size of the diameter of the inside of the bottom of the hoof. Then bend the circle to be perpendicular to the rest of the wire, and insert the wire circle into the bottom of the hoof. This wire will support the weight of the Unicorn and be poseable. It is optional. You can also wait to insert this wire until the leg is complete, but it will be a small challenge to fit it through the leg to the hoof. Pipe cleaners are not strong enough to function as the wire for this soft sculpture. If you want the support of wire, it needs to be robust. Begin to stuff the leg medium-firm with fiberfill; continue to stuff as you work.
| NOTE: Optionally , you can add a glass gem to the base of the hoof by itself or you can add it on top of the wire loop at the base of the hoof or you can skip the glass gems all together. |
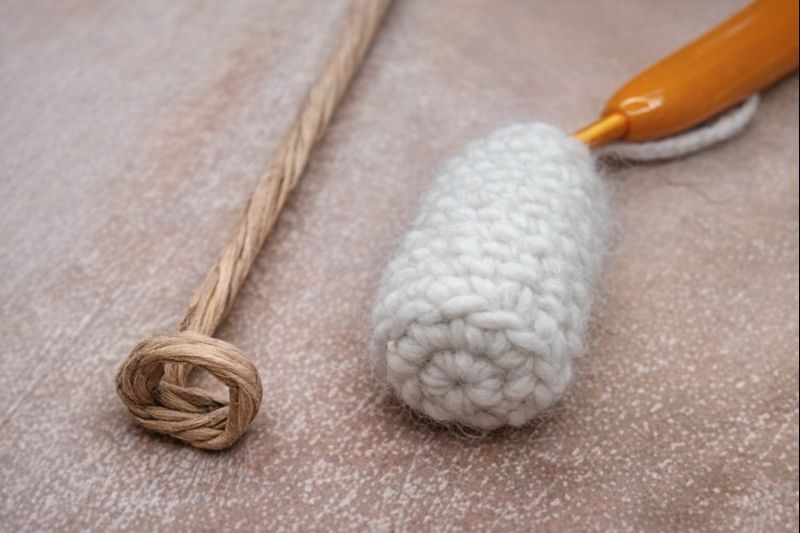
- SC, <Dec>, SC, <Dec>, SC 7, Sl St to beginning stitch, Ch 1 [11]
- SC 11, Sl St to beginning stitch, Ch 1 [11]
- SC 2, 2 Dec in 3 SC, SC 6, SI St to beginning stitch, Ch 1 [10]
- SC 2, Dec, SC 6, SI St to beginning stitch, Ch 1 [9]
- SC 2, Dec, SC 2, 2 Dec in 3 SC, SI St to beginning stitch, Ch 1 [7]
13–17. (5 rows of) SC 7, SI St to beginning stitch, Ch 1 [7]
- SC 2, Inc, SC 4, SI St to beginning stitch, Ch 1 [8]
- (SC, Inc) x 4, SI St to beginning stitch, Ch 1 [12]
- SC 12, SI St to beginning stitch, Ch 1 [12]
- (SC, Dec) x 4, SI St to beginning stitch, Ch 1 [8]
- SC 8, SI St to beginning stitch, Ch 1 [8]
- SC 3, Inc, SC 4, SI St to beginning stitch, Ch 1 [9]
- SC 9, SI St to beginning stitch, Ch 1 [9]
- SC 8, Inc, SI St to beginning stitch, Ch 1 [10]
- SC 10, SI St to beginning stitch, Ch 1 [10]
- SC 5, <Dec>, SC 5, SI St to beginning stitch, Ch 1 [11]
- SC 10, Inc, SI St to beginning stitch, Ch 1 [12]
- SC 12, SI St to beginning stitch, Ch 1 [12]
Fasten off with short yarn tail; tuck this yarn tail inside the leg.
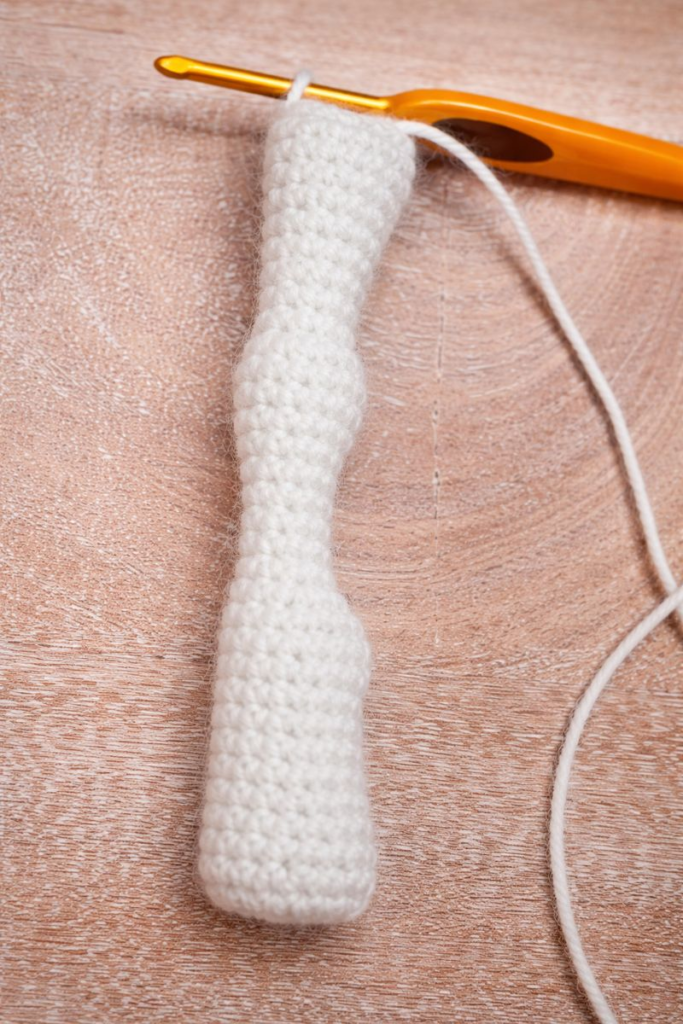
Unicorn Front Leg
Your two front legs will be numbered as #2 and #3. Mark the following stitches accordingly; this is for assembly when you create the body.
Leg #2: Mark the 6th stitch
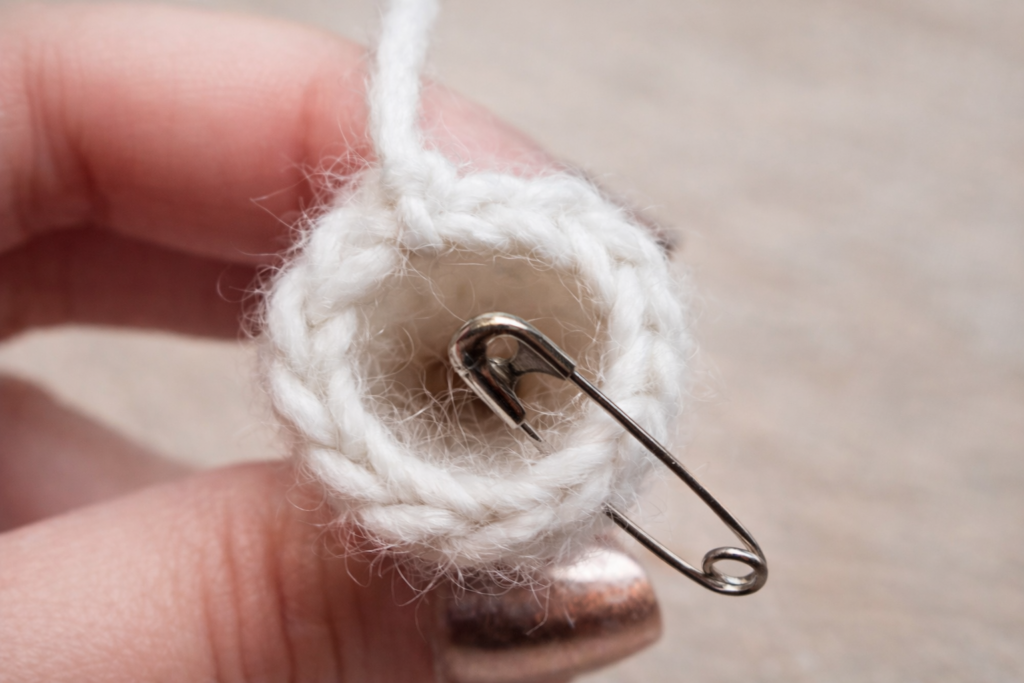
Leg #3: Mark the 12th stitch
UNICORN REAR LEG (MAKE 2)
Optional: Hoof color yarn (approximately 4 yds/3.75 m)
Optional: 2 pieces of 18-in/46-cm, 18-gauge, paper-wrapped stem wire, or alternative that is strong yet moldable
With US size G (4 mm) crochet hook:
- Optionally start with the Hoof color yarn, SC 6 in Magic Circle, Sl St to beginning stitch, Ch 1 [6]
- Inc x 6, Sl St to beginning stitch, Ch 1 [12]
- BLO [SC 6, HDC 6], Sl St to beginning stitch, Ch 1 [12]
- SC 6, HDC 6, Sl St to beginning stitch, Ch 1 [12]
| If you started with the Hoof Color yarn, switch to the Main Body Color yarn here. |
- SC 8, Dec, SC 2, S1 St to beginning stitch, Ch 1 [11]
- SC, 2 Dec in 3 SC, SC 7, S1 St to beginning stitch, Ch 1 [10]
- SC, Dec, SC 7, S1 St to beginning stitch, Ch 1 [9]
NOTE: At this point, you can take one wire and bend the end of it into a circle the size of the diameter of the inside of the bottom of the hoof. Then bend the circle to be perpendicular to the rest of the wire, and insert the wire circle into the bottom of the hoof. This wire will support the weight of the Unicorn and be poseable. It is optional. You can also wait to insert this wire until the leg is complete, but it will be a small challenge to fit it through the leg to the hoof. Pipe cleaners are not strong enough to function as the wire for this soft sculpture. If you want the support of wire, it needs to be robust. Begin to stuff the leg medium-firm with fiberfill; continue to stuff as you work.
| NOTE: Optionally, you can add a glass gem to the base of the hoof by itself or you can add it on top of the wire loop at the base of the hoof or you can skip the glass gems all together. |
- SC, <Dec>, SC, <Dec>, SC 7, Sl St to beginning stitch, Ch 1 [11]
- SC 11, Sl St to beginning stitch, Ch 1 [11]
- SC, 2 Dec in 3 SC, SC 7, Sl St to beginning stitch, Ch 1 [10]
- SC 6, 2 Dec in 3 SC, SC, Sl St to beginning stitch, Ch 1 [9]
- SC, 2 Dec in 3 SC, SC 2, Dec, SC, Sl St to beginning stitch, Ch 1 [7]
13-14. (2 rows of) SC 7, Sl St to beginning stitch, Ch 1 [7]
- SC 2, <Dec>, SC 2, 2 Dec in 3 SC, Sl St to beginning stitch, Ch 1 [7]
16-18. (3 rows of) SC 7, Sl St to beginning stitch, Ch 1 [7]
- SC 2, Inc, SC 4, Sl St to beginning stitch, Ch 1 [8]
- SC, Inc x 4, SC 3, Sl St to beginning stitch, Ch 1 [12]
- SC 12, Sl St to beginning stitch, Ch 1 [12]
- SC, Dec, HDC 4, Dec, SC 3, Sl St to beginning stitch, Ch 1 [10]
- SC 3, HDC 5, SC 2, SI St to beginning stitch, Ch 1 [10]
- SC, <Dec>, SC 4, Dec, SC 3, SI St to beginning stitch, Ch 1 [10]
- SC 7, <Dec>, SC 3, SI St to beginning stitch, Ch 1 [11]
- HDC, <HDC Dec>, HDC 2, SC 7, HDC, SI St to beginning stitch, Ch 1 [12]
- SC 12, SI St to beginning stitch, Ch 1 [12]
- HDC 2, <HDC Dec>, HDC 3, SC 3, <Dec>, SC 3, HDC, SI St to beginning stitch, Ch 1 [14]
- SC 8, Inc, SC 2, Inc, SC 2, SI St to beginning stitch, Ch 1 [16]
- SC 13, Inc, SC 2, SI St to beginning stitch, Ch 1 [17]
- SC 4, <Dec>, SC 13, SI St to beginning stitch, Ch 1 [18]
- SC 18, SI St to beginning stitch, Ch 1 [18]
- (SC 5, Inc) x 3, SI St to beginning stitch, Ch 1 [21]
- SC 21, SI St to beginning stitch, Ch 1 [21]
- SC 3, Inc, (SC 6, Inc) x 2, SC 3, SI St to beginning stitch, Ch 1 [24]
Fasten off with short yarn tail; tuck this yarn tail inside the leg.
Unicorn Rear Leg
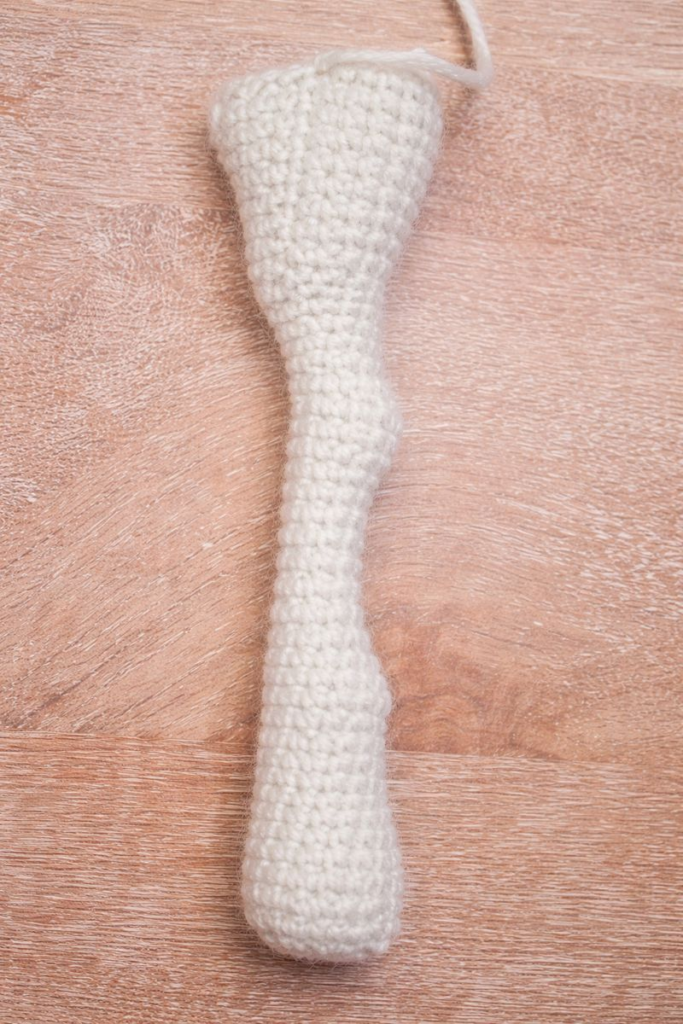
Your two back legs will be numbered
as #1 and #4. Mark the following
stitches accordingly; this is for
assembly when you create the body.
Leg #1: Mark the 16th stitch
Leg #3: Mark the 12th stitch
UNICORN REAR LEG (MAKE 2)
Optional: Hoof color yarn (approximately 4 yds/3.75 m)
Optional: 2 pieces of 18-in/46-cm, 18-gauge, paper-wrapped stem wire, or alternative that is strong yet moldable
With US size G (4 mm) crochet hook:
- Optionally start with the Hoof color yarn, SC 6 in Magic Circle, SI St to beginning stitch, Ch 1 [6]
- Inc x 6, SI St to beginning stitch, Ch 1 [12]
- BLO [SC 6, HDC 6], SI St to beginning stitch, Ch 1 [12]
- SC 6, HDC 6, SI St to beginning stitch, Ch 1 [12]
If you started with the Hoof Color yarn, switch to the Main Body Color yarn here.
- SC 8, Dec, SC 2, Sl St to beginning stitch, Ch 1 [11]
- SC, 2 Dec in 3 SC, SC 7, Sl St to beginning stitch, Ch 1 [10]
- SC, Dec, SC 7, Sl St to beginning stitch, Ch 1 [9]
NOTE: At this point, you can take one wire and bend the end of it into a circle the size of the diameter of the inside of the bottom of the hoof. Then bend the circle to be perpendicular to the rest of the wire, and insert the wire circle into the bottom of the hoof. This wire will support the weight of the Unicorn and be poseable. It is optional. You can also wait to insert this wire until the leg is complete, but it will be a small challenge to fit it through the leg to the hoof. Pipe cleaners are not strong enough to function as the wire for this soft sculpture. If you want the support of wire, it needs to be robust. Begin to stuff the leg medium-firm with fiberfill; continue to stuff as you work.
NOTE: Optionally, you can add a glass gem to the base of the hoof by itself or you can add it on top of the wire loop at the base of the hoof or you can skip the glass gems all together.
- SC, <Dec>, SC, <Dec>, SC 7, SI St to beginning stitch, Ch 1 [11]
- SC 11, SI St to beginning stitch, Ch 1 [11]
- SC, 2 Dec in 3 SC, SC 7, SI St to beginning stitch, Ch 1 [10]
- SC 6, 2 Dec in 3 SC, SC, SI St to beginning stitch, Ch 1 [9]
- SC, 2 Dec in 3 SC, SC 2, Dec, SC, SI St to beginning stitch, Ch 1 [7]
13–14. (2 rows of) SC 7, SI St to beginning stitch, Ch 1 [7]
- SC 2, <Dec>, SC 2, 2 Dec in 3 SC, SI St to beginning stitch, Ch 1 [7]
16–18. (3 rows of) SC 7, SI St to beginning stitch, Ch 1 [7]
- SC 2, Inc, SC 4, SI St to beginning stitch, Ch 1 [8]
- SC, Inc x 4, SC 3, SI St to beginning stitch, Ch 1 [12]
- SC 12, SI St to beginning stitch, Ch 1 [12]
- SC, Dec, HDC 4, Dec, SC 3, SI St to beginning stitch, Ch 1 [10]
- SC 3, HDC 5, SC 2, SI St to beginning stitch, Ch 1 [10]
- SC, <Dec>, SC 4, Dec, SC 3, SI St to beginning stitch, Ch 1 [10]
- SC 7, <Dec>, SC 3, SI St to beginning stitch, Ch 1 [11]
- HDC, <HDC Dec>, HDC 2, SC 7, HDC, SI St to beginning stitch, Ch 1 [12]
- SC 12, SI St to beginning stitch, Ch 1 [12]
- HDC 2, <HDC Dec>, HDC 3, SC 3, <Dec>, SC 3, HDC, SI St to beginning stitch, Ch 1 [14]
- SC 8, Inc, SC 2, Inc, SC 2, SI St to beginning stitch, Ch 1 [16]
- SC 13, Inc, SC 2, SI St to beginning stitch, Ch 1 [17]
- SC 4, <Dec>, SC 13, SI St to beginning stitch, Ch 1 [18]
- SC 18, SI St to beginning stitch, Ch 1 [18]
- (SC 5, Inc) x 3, SI St to beginning stitch, Ch 1 [21]
- SC 21, SI St to beginning stitch, Ch 1 [21]
- SC 3, Inc, (SC 6, Inc) x 2, SC 3, Sl St to beginning stitch, Ch 1 [24]
Fasten off with short yarn tail; tuck this yarn tail inside the leg.
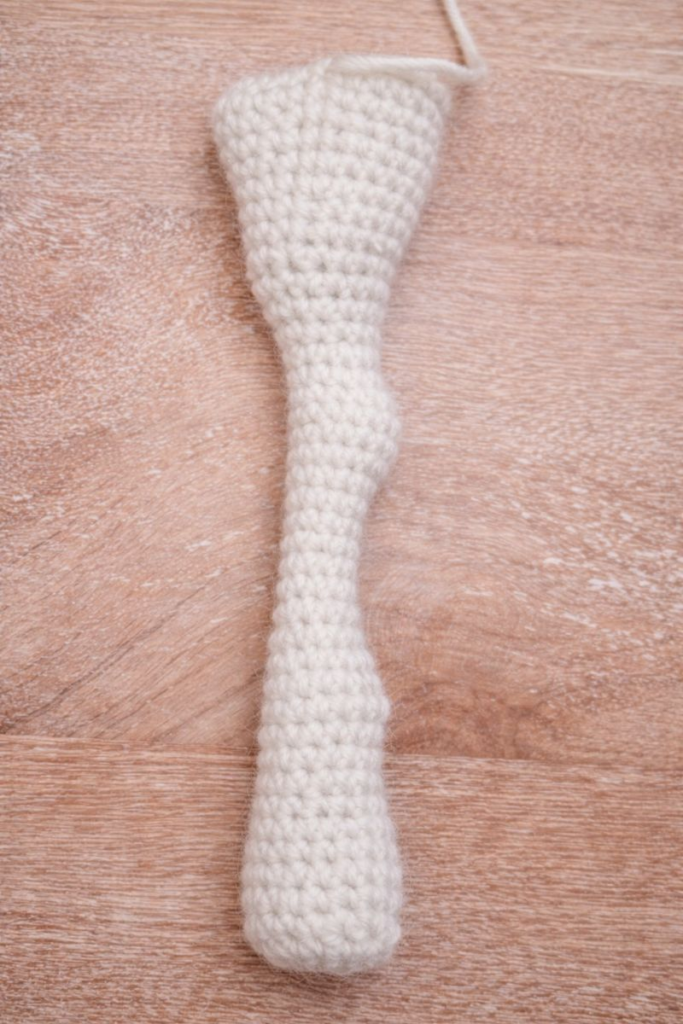
Unicorn Rear Leg
Your two back legs will be numbered as #1 and #4. Mark the following stitches accordingly; this is for assembly when you create the body.
Leg #1: Mark the 16th stitch
Leg #4: Mark the 5th stitch
UNICORN BODY
With US size G (4 mm) crochet hook:
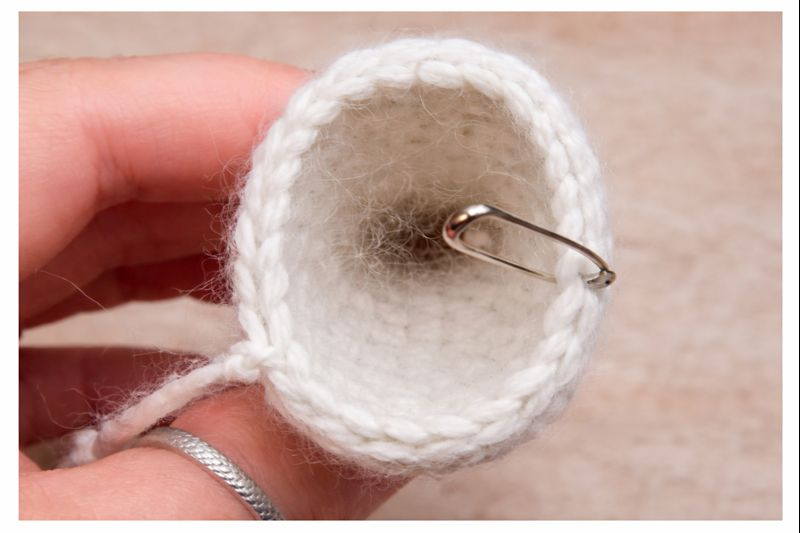
- Ch 24, starting in the 2nd Ch from hook, Inc, SC 21, Inc x 2 in the same stitch, continue to crochet around to the opposite side of the starting chain, SC 21, Inc, Sl St to beginning stitch, Ch 1 [50]
- Inc x 2, SC 21, Inc x 4, SC 21, Inc x 2, Sl St to beginning stitch, Ch 1 [58]
3A. Inc into the first available stitch on the current work (aka the body)
3B. SC into Leg #1’s marked stitch AND the next available stitch on the body at the same time
| Whenever you insert your hook into any Leg and the Body in this row, you will be inserting your hook from the inside/wrong side of the stitch on the Leg to the outside/right side of the Leg and then into the outside/right side to the inside/wrong side of the stitch on the Body. |
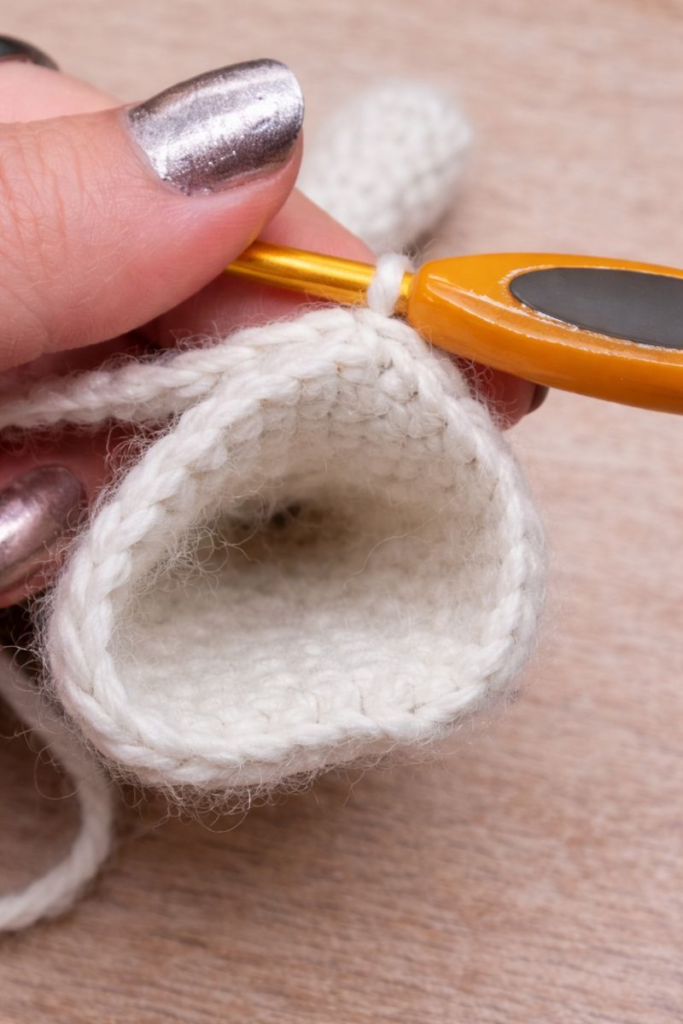
3C. Working into both Leg #1 and the Body at the same time, SC 3
3D. SC in the next available stitch on Leg #1 and the SAME body stitch that you last crocheted into
3E. Working into both Leg #1 and the Body at the same time, SC 3
3F. SC 16 in the Body only
3G. SC into Leg #2’s marked stitch AND the next available stitch on the Body at the same time
3H. Working into both Leg #2 and the Body at the same time, SC 3
3I. Inc x 2 into only the body
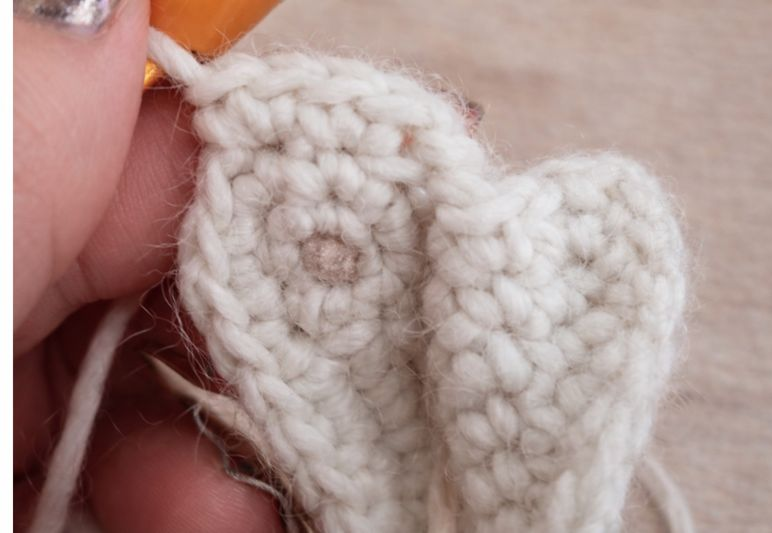
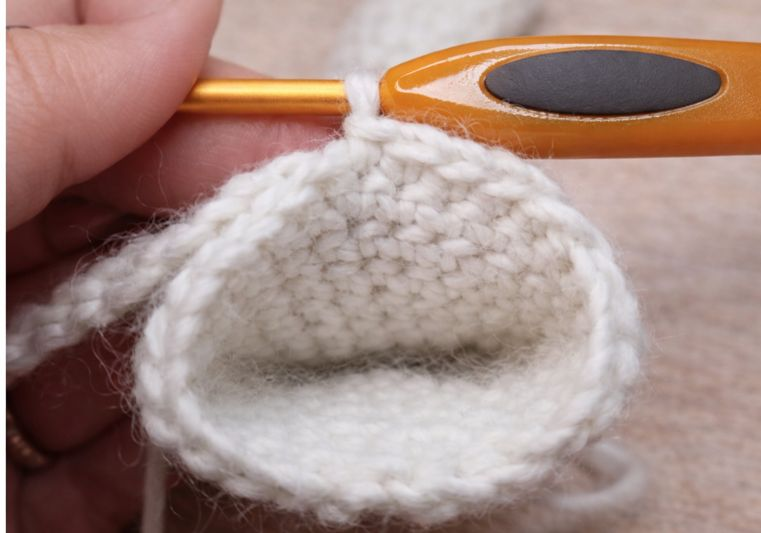
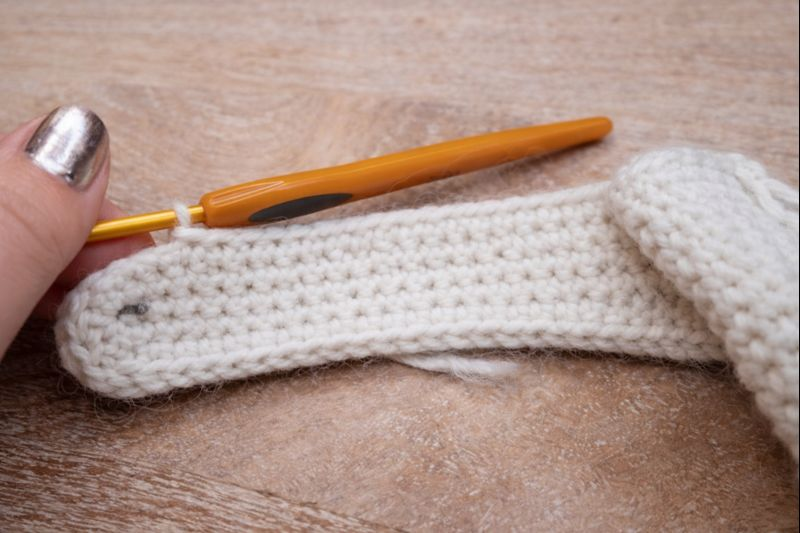
3J. SC into Leg #3’s marked stitch AND the next available stitch on the Body at the same time
3K. Working into both Leg #3 and the Body at the same time, SC 3
3L. SC 16 in the Body only
| The “Connect” instruction refers to the next available stitch that was used to connect the Body and the Leg from Row 3. For example, when you work a Decrease into the Body & Connect, you will start the Decrease into the next available stitch on the Body and finish the Decrease into the next available stitch that was used to connect the Body with the Leg in Row 3.Whenever you insert your hook into any leg in this row, you will be inserting your hook from the outside/right side to the inside/wrong side of the work. Do not crochet into any of the S1 St joins on the legs. Unless specifically instructed to work into/use one of the stitches used to connect the leg and the body, you will be working around the outside edge of the body and legs, and you will ignore the stitches used to connect the leg and body. |
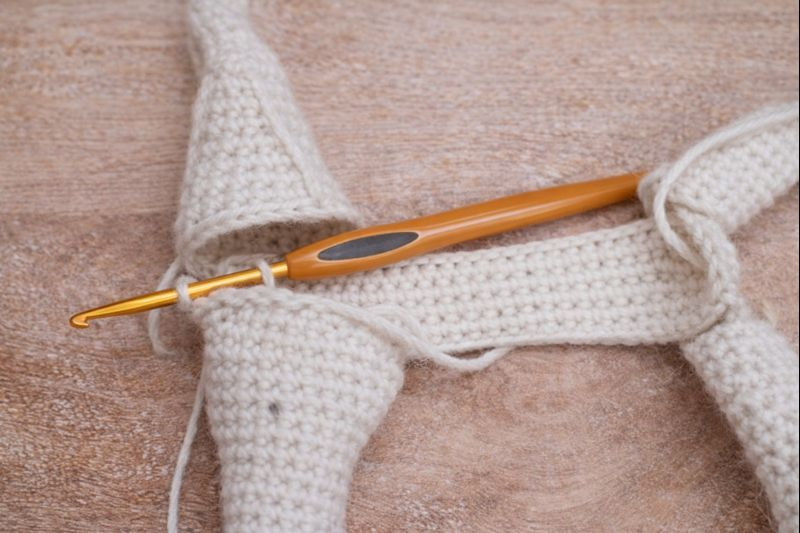
- SC, Dec (Into the Body & Connect), SC 15, Triple SC Decrease (Leg & Connect & Body), SC 15, Dec (Connect & Leg), SC 7, Dec (Connect & Body), SC 2, Dec (Body & Connect), SC 7, Dec (Leg & Connect), SC 15, Triple SC Dec (Body & Connect & Leg), SC 15, Dec (Connect & Body), SC, SI St to beginning stitch, Ch 1 [86]
- Dec, SC 15, Dec, SC 13, Dec, SC 7, Inc, Dec, Inc, SC 7, Dec, SC 13, Dec, SC 15, Dec, SI St to beginning stitch, Ch 1 [81]
- Dec, Inc, SC 13, Dec, SC 11, Dec, Inc, SC 5, Inc, SC 5, Inc, SC 5, Inc, Dec, SC 11, Dec, SC 13, Inc, Dec, SI St to beginning stitch, Ch 1 [81]
- Dec, Inc, SC 12, Dec, SC 11, Dec, SC 10, Inc, SC 10, Dec, SC 11, Dec, SC 12, Inc, Dec, SI St to beginning stitch, Ch 1 [78]
- SC 78, SI St to beginning stitch, Ch 1 [78]
- SC 2, Dec, SC, Inc, SC 10, Dec, SC 10, Dec, SC 6, Inc, SC 6, Inc, SC 6, Dec, SC 10, Dec, SC 10, Inc, SC, Dec, SI St to beginning stitch, Ch 1 [76]
- SC 38, <Dec>, SC 38, SI St to beginning stitch, Ch 1 [77]
- SC 7, Dec, SC 5, Dec, SC 47, (Dec, SC 5) x 2, SI St to beginning stitch, Ch 1 [73]
- SC 6, Dec, SC 4, Dec, SC 47, (Dec, SC 4) x 2, Sl St to beginning stitch, Ch 1 [69]
- SC 12, Dec, SC 12, Inc, SC 9, Inc, SC 9, Inc, SC 12, Dec, SC 8, Sl St to beginning stitch, Ch 1 [70]
| NOTE: At this point, if you haven’t already inserted wires, you can insert them now. If you make the wire circle the size of the hoof, it may take some effort to fully insert the wire all the way into the leg, but it can be done. After you insert the wire, you can optionally insert one glass gem each with the flat side down. And then you can stuff each hoof/leg. |
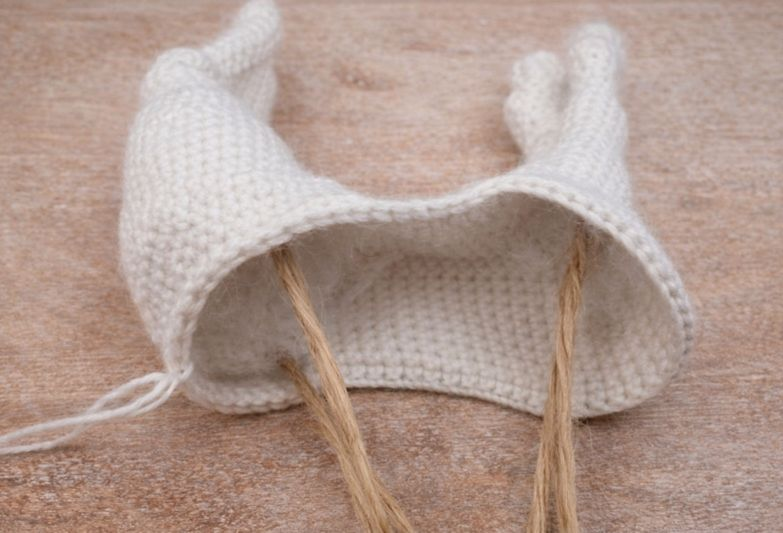
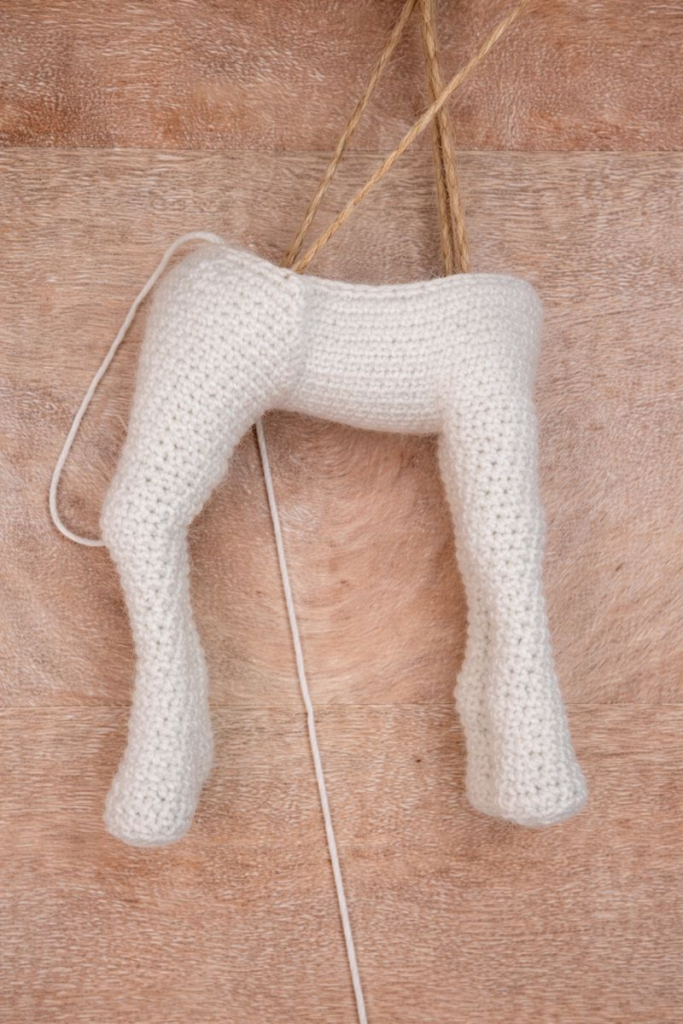
| NOTE: If you are using wire, at this point bend the back leg wire at a 90-degree angle toward the chest of the Unicorn. Make a bend at the same height as the current row level. |
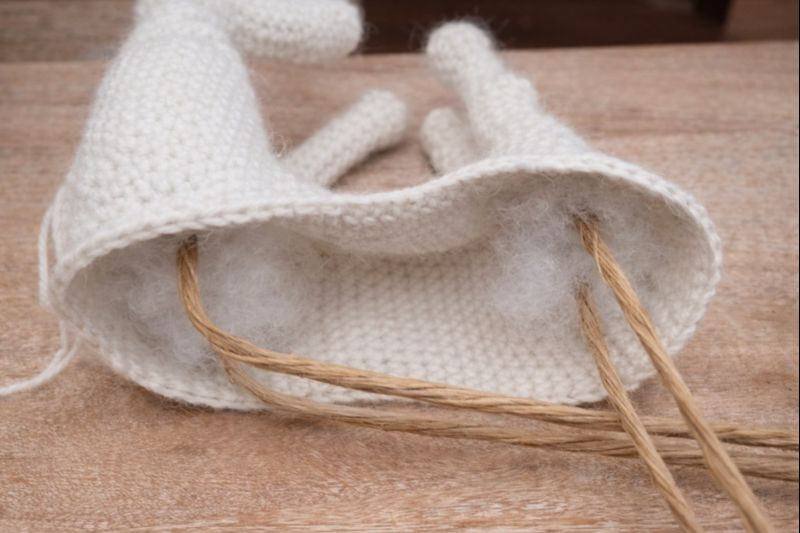
- (SC 4, Dec) x 2, SC 3, Ch 2, Skip 43 stitches, (SC 4, Dec) x 2, Sl St to beginning stitch, Ch 1 [25]
| The stitch count includes the Ch stitches. Place a stitch marker in the 43rd skipped stitch to be referenced when attaching the yarn for the Neck. |
- (SC 2, Dec) x 5, Sl St to beginning stitch, Ch 1 [15]
- (SC, Dec) x 5, Sl St to beginning stitch, Ch 1 [10]
- (SC 3, Dec) x 5, Sl St to beginning stitch, Ch 1 [20]
- Dec x 5, Sl St to beginning stitch [5]
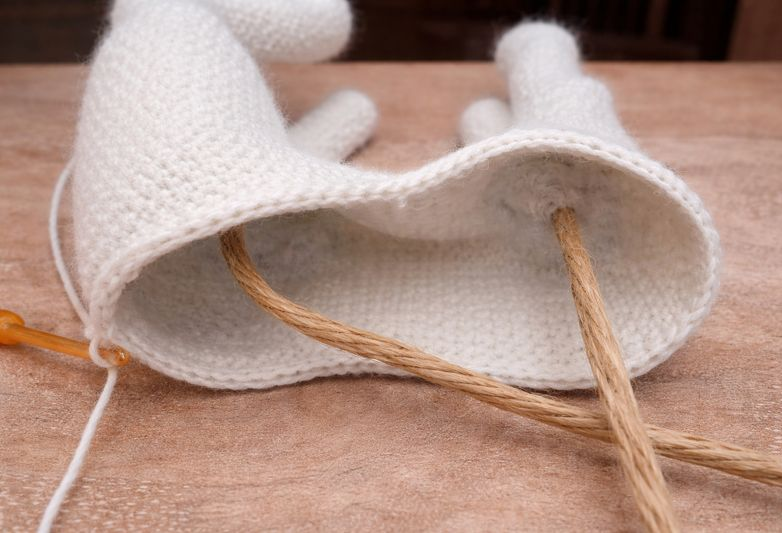
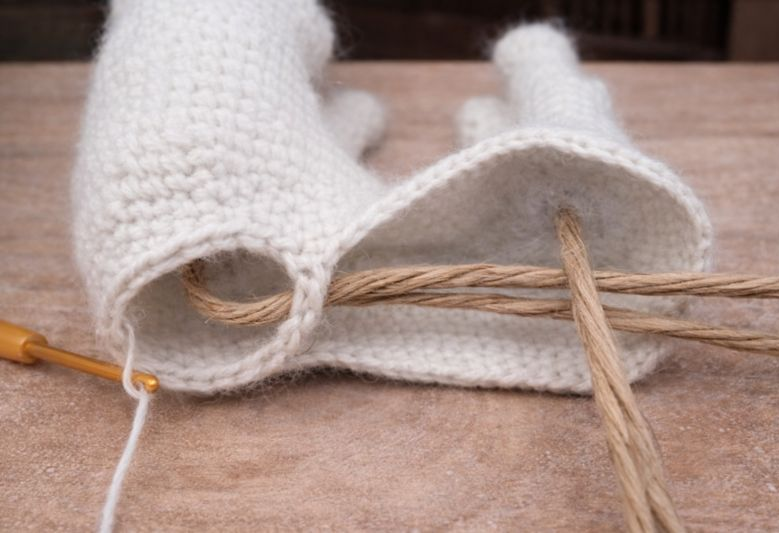
Fasten off yarn with a long enough yarn tail to sew the hole shut. Stuff the body to this point medium-firm.
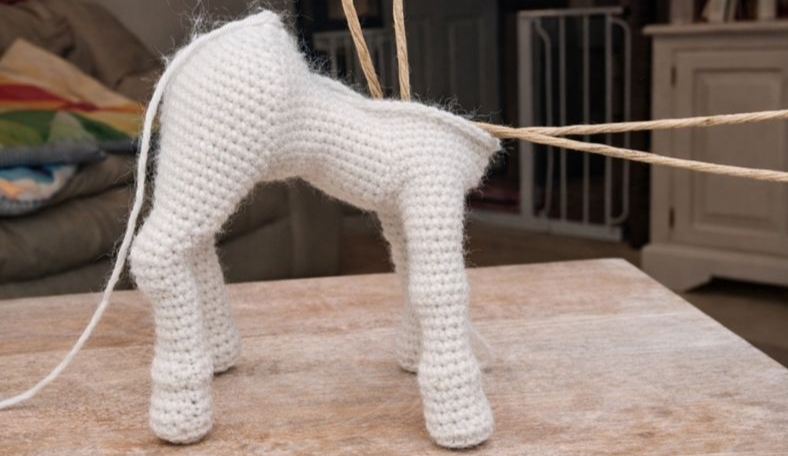
Unicorn Neck
With US size G (4 mm) crochet hook:
| Starting with a long enough yarn tail to weave in later, attach the yarn to the marked SC just before the Ch stitches in Row 14 of the Unicorn Body. |
- Dec, SC 2, Dec, Ch 1, Turn [4]
The second leg of the 2nd Decrease should be into the 1st available stitch after the Chain stitches.
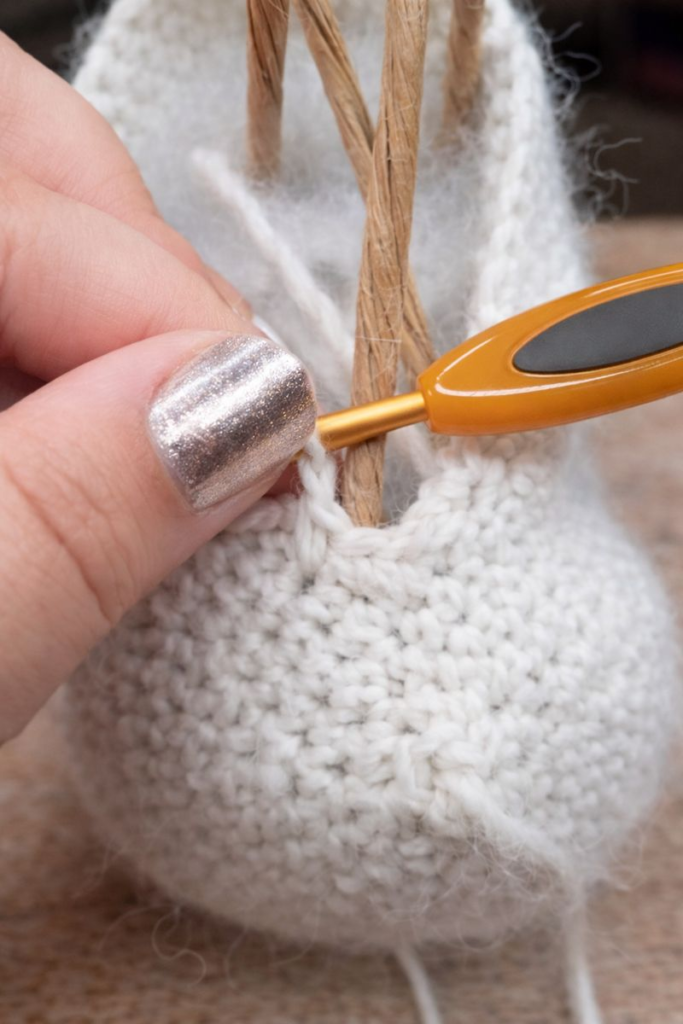
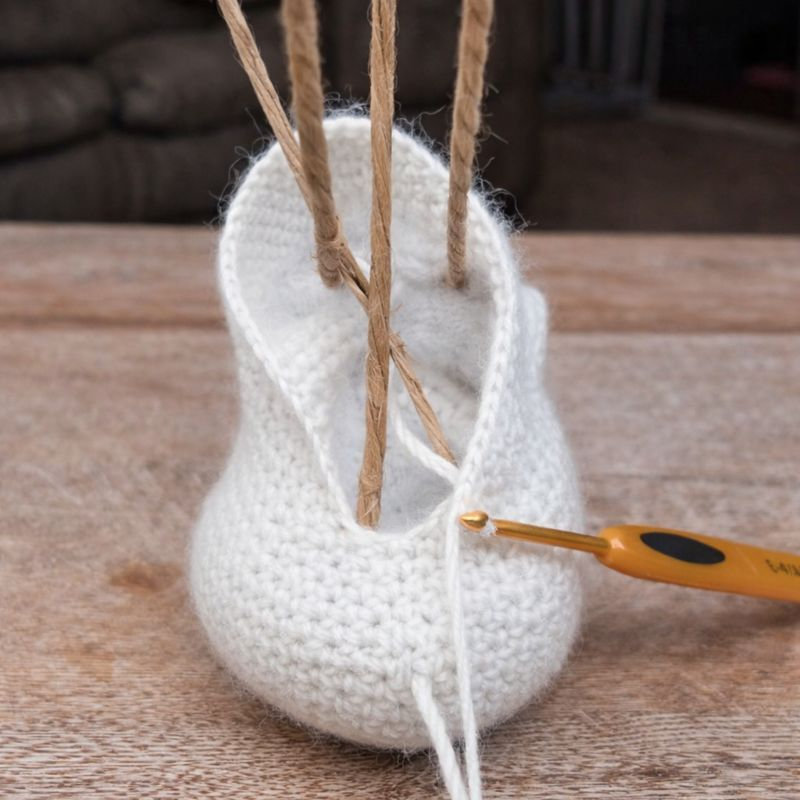
- SC 3, Dec, SC 31, Sl St to beginning stitch, Ch 1 [35]
| If, for whatever reason, you are left with an extra stitch at the end of Row 11 (room for 32 instead of 31), make a Decrease into the final two stitches so that you come out of this row with the correct stitch count of 35. |
- SC 3, Dec, SC 28, Dec, Sl St to beginning stitch, Ch 1 [33]
| Starting with Row 13, do not slip stitch, Ch 1 at the end of the row unless otherwise noted. The stitch count is the topmost stitch count once the row is complete, not the cumulative number of stitches made in the row instructions. You will sometimes go beyond where the row began or where the previous row ended. Always work into stitches as normal; do not work into the side of stitches. Follow the instructions exactly as written. |
13A. 2 Dec in 3 SC, Dec, SC 20, Ch 1, Turn
13B. SC 10, Ch 1, Turn
13C. SC 16, Dec, Sl St to beginning stitch, Ch 1 [30]
14. Dec, SC 5, Dec, SC 14, Dec, SC 5, Sl St to beginning stitch, Ch 1 [27]
15A. SC 7, Dec, SC 7, Dec, SC 4, Ch 1, Turn
15B. SC 12, Ch 1, Turn
15C. SC 15, Dec, Sl St to beginning stitch, Ch 1 [24]
16. SC 24, Sl St to beginning stitch, Ch 1 [24]
| Keep stuffing with fiberfill as you go. At this point you can bend the wires that are sticking straight out from the rear legs so that they are now aimed upward through the neck. |
17A. SC 20, Ch 1, Turn
17B. SC 12, Ch 1, Turn
17C. SC 16, Sl St to beginning stitch, Ch 1 [16]
- SC 12, Dec, SC 10, Sl St to beginning stitch, Ch 1 [23]
- SC 12, 2 Dec in 3 SC, SC 8, Sl St to beginning stitch, Ch 1 [22]
- SC 22, Sl St to beginning stitch, Ch 1 [22]
- SC 12, Dec, SC 8, Sl St to beginning stitch, Ch 1 [21]
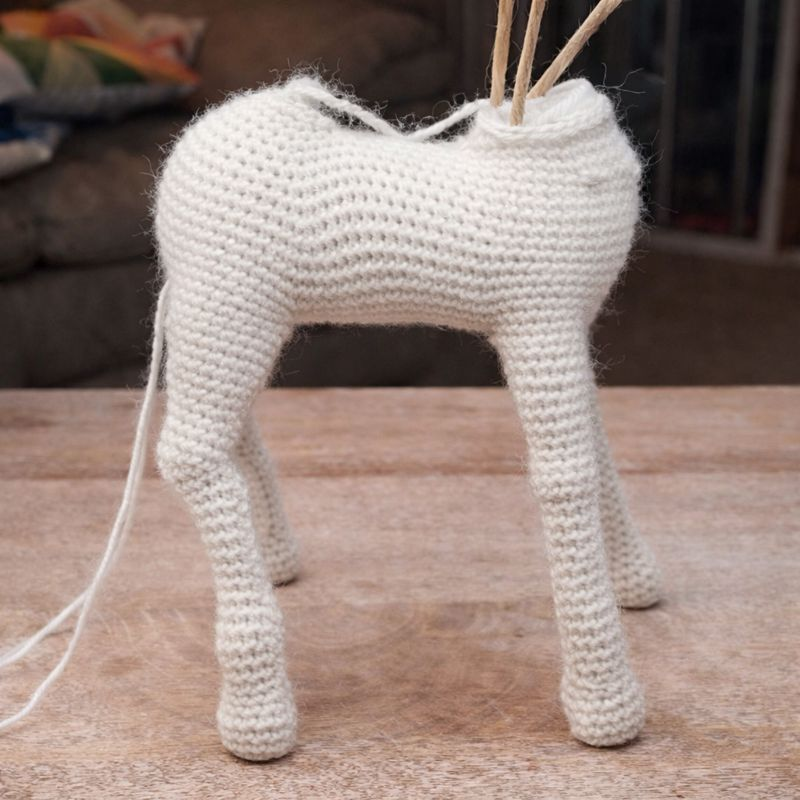
| At this point, without pulling on the wires too much, tape one of the rear leg wires to the front leg wire. And then tape the other rear leg wire to the front leg wire using thin strips of duct tape. |
22. SC 12, Dec, SC 7. Continue in spiral. [20]
23. SC 20 [20]
24A. SC 8, Ch 1, Turn
24B. SC 10, Ch 1, Turn
24C. SC 9, SC/HDC Dec, SC 8, HDC/SC Dec, SC 18 [18]
- SC 18 [18]
- SC 12, 2 Dec in 3 SC, SC 3 [17]
- SC 17 [17]
- SC 3, 2 Dec in 3 SC, SC 11 [16]
29A. SC 12, Inc x 2, SC 11, Ch 1, Turn
| Stuff the neck firmly up to the open hole; you can fill this in a bit more as you affix the head to the neck. |
29B. SC 8, Ch 1, Turn
29C. SC 8, Ch 1, Turn
29D. SC 8, Ch 1, Turn
29E. SC 8, Ch 1, Turn
29F. SC, Ch 6, starting in the 2nd Ch from hook, SC 3, HDC 2, continuing across the Unicorn Neck SC 6, Ch 6, starting in the 2nd Ch from hook, SC 3, HDC 2, in the last stitch available on the Unicorn Neck make a SC, Ch 1, Turn
| The “Ch 6, starting in the 2nd Ch from hook, SC 3, HDC 2” is the start of the Unicorn Ear. |
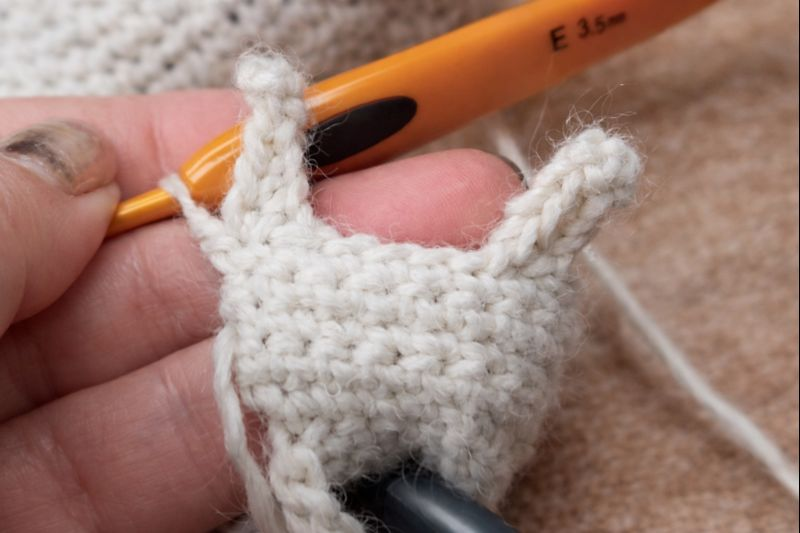
29G. SC, Upper Ear (SC, HDC 2, SC 2, Ch 2, Sl St in the 2nd Ch from Hook, SC in the same stitch that you last Single Crocheted into, SC, HDC 2, SC), SC 6, Upper Ear (SC, HDC 2, SC 2, Ch 2, Sl St in the 2nd Ch from hook, SC in the same stitch that you last Single Crocheted into, SC, HDC 2, SC), SC, Ch 1, Turn
The Upper Ear is created by crocheting up the side of the “Ch 6, starting in the 2nd Ch from hook, SC 3, HDC 2” that you made in 29F. The 1st four stitches (SC, HDC 2, SC) are made going up the side of those stitches. The next SC is made in the last available stitch; then you Ch 2, Sl St in the 2nd Ch from hook. The next SC is made in the 1st available stitch on the other side of the stitches from 29F. The last four stitches (SC, HDC 2, SC) are made down the other side to the end of the stitches from 29F to create the ear.
29H. SC, Skip Ear, SC 6, Skip Ear, SC
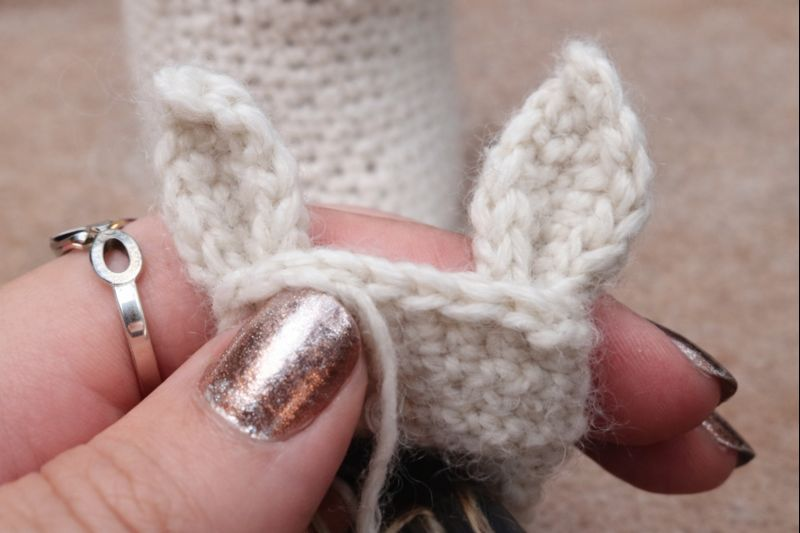
Fasten off with 24 in/61 cm long yarn tail
UNICORN HEAD
With US size G (4 mm) crochet hook:
- SC 6 in Magic Circle, Sl St to beginning stitch, Ch 1 [6]
- (HDC, Inc) x 3, Sl St to beginning stitch, Ch 1 [9]
- SC 3, Ch 2, SC in the same stitch as your last SC, SC 3, Ch 2, SC in the same stitch as your last SC, SC C, Inc, Sl St to beginning stitch, Ch 1 [12]
| The “SC, Ch 2, SC in the same stitch as your last SC” is what creates a tiny nostril. Leave the chain stitches unworked and do not crochet into them in Row 4. |
- SC 3, Skip Ch stitches, SC 4, Skip Ch stitches, SC 4, <Dec>, SC, Sl St to beginning stitch, Ch 1 [13]
- SC 4, Dec, SC 4, Triple SC Dec, Sl St to beginning stitch, Ch 1 [10]
- SC 10, Sl St to beginning stitch, Ch 1 [10]
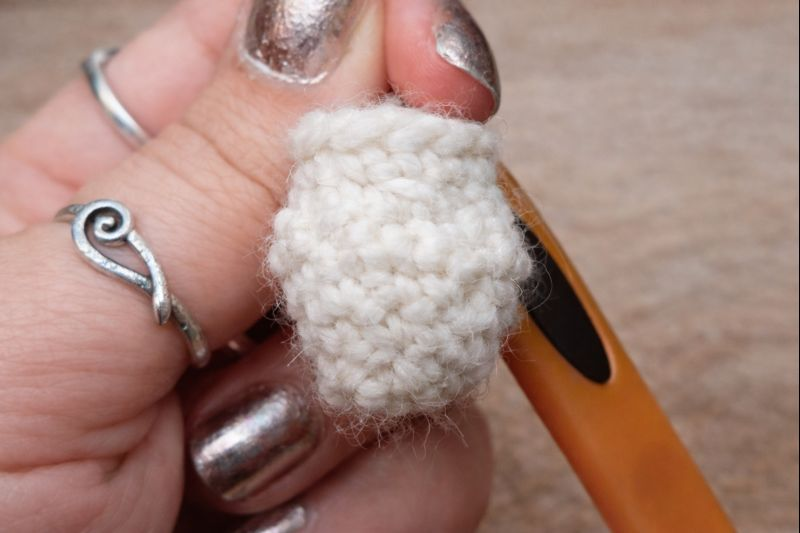
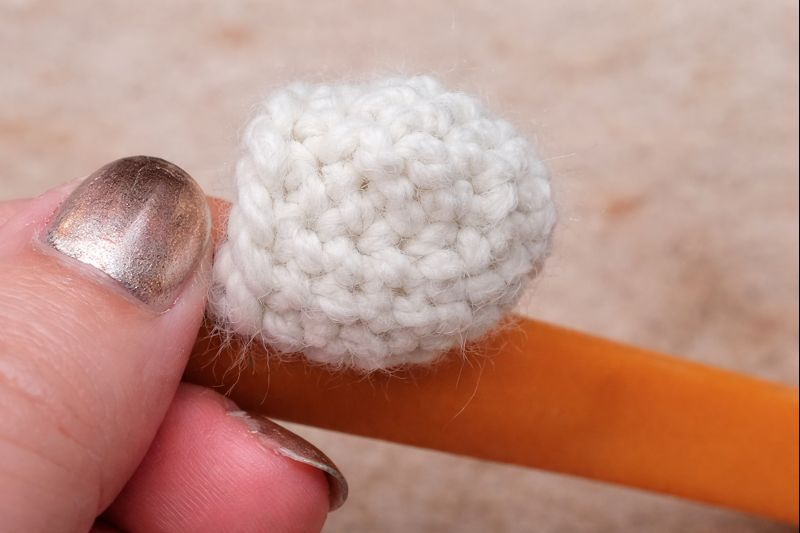
- (SC 4, Inc) x 2, Sl St to beginning stitch, Ch 1 [12]
- SC 12, Sl St to beginning stitch, Ch 1 [12]
- (SC 3, Inc) x 3, Sl St to beginning stitch, Ch 1 [15]
- SC 2, Inc, (SC 4, Inc) x 2, SC 2, Sl St to beginning stitch, Ch 1 [18]
- (SC 5, Inc) x 3, Sl St to beginning stitch, Ch 1 [21
- SC 21, Sl St to beginning stitch, Ch 1 [21]
- SC 3, Inc, (SC 6, Inc) x 2, SC 3, Sl St to beginning stitch, Ch 1 [24]
- SC 24, Sl St to beginning stitch, Ch 1 [24]
- SC 24, Sl St to beginning stitch, Ch 1 [24]
| Insert 18 mm–21 mm eyes between Rows 11 and Row 12, with 8 full stitch spaces between them. |
- (SC 4, Dec) x 4, Sl St to beginning stitch, Ch 1 [20]
- (SC 2, Dec) x 5, Sl St to beginning stitch, Ch 1 [15]
- (SC, Dec) x 5, Sl St to beginning stitch [10]
Fasten off with 18 in/46 cm long yarn tail. Stuff with fiberfill.
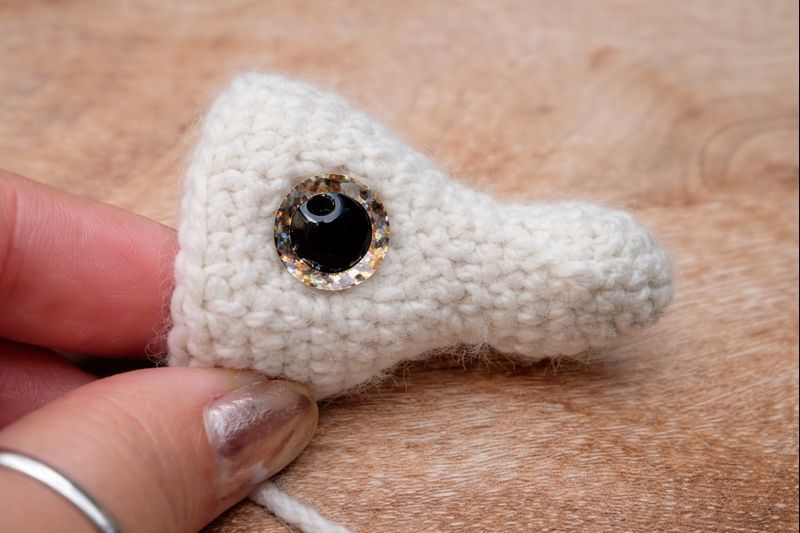
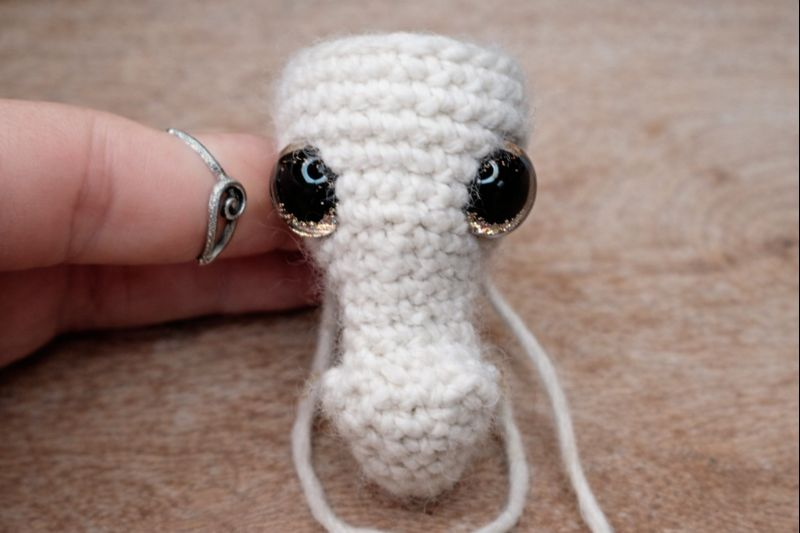
Using the hole in the back of the head, slide the head onto the protruding wire from the neck of the body of the unicorn. You want the wire to slide along the inside-top of the head, along the forehead and down to the nose of the unicorn. If the wire is too long, trim it or bend it back on itself and secure with duct tape. If the wire ends somewhere mid-head, that’s fine. Stretch the back of the neck and ears up over the back of the head. Pin in place, sew in place. (I suggest whipstitches around the entire head everywhere it touches the neck.) If you are using wire, you can leave the final positioning up to bending the wire. If you are not using wire, you need to position the head in place exactly as you want it to be when you are finished.
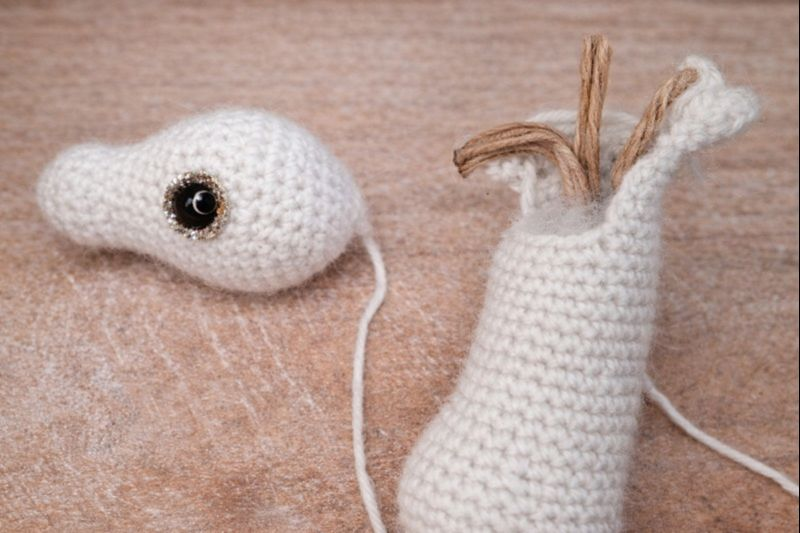
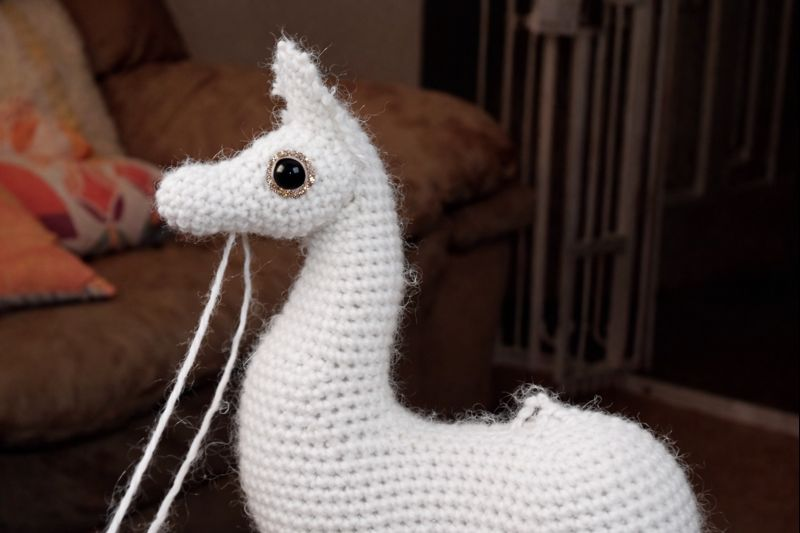
UNICORN PUFFY CLOUD MANE (MAKE 1)
UNICORN PUFFY CLOUD
MANE (MAKE 1)
Option 1
With US size G (4 mm) crochet hook:
- Starting with a long enough yarn tail to weave in later, Ch 39, Turn, starting in the 2nd Ch from hook, Sl St 2, SC 2, Inc x 2, HDC Inc x 2, DC Inc x 30, Ch 2, Turn [72]
| The Ch 2 is a turning chain; you will not crochet into it. This applies to every row in this section. |
- DC 60, HDC 4, SC 4, Sl St, Ch 1, Turn [69]
- Skip the Slip Stitch, Dec x 2, HDC Dec x 2, DC Dec x 30, Ch 47, Turn [34]
- Starting in the 2nd Ch from hook, Sl St 2, SC 2, Inc x 2, HDC Inc x 4, DC Inc x 36, Ch 2, Turn [88]
- DC 70, HDC 10, SC 3, Sl St, Ch 1, Turn [84]
- Skip the Slip Stitch, SC, Dec x 2, HDC Dec x 4, DC Dec x 35, Ch 57, Turn [42]
- Starting in the 2nd Ch from hook, Sl St 2, SC 2, Inc x 2, HDC Inc x 6, DC Inc x 44, Ch 2, Turn [108]
- DC 84, HDC 14, SC 7, Sl St, Ch 1, Turn [106]
- Skip the Slip Stitch, SC, Dec x 3, HDC Dec x 7, DC Dec x 42, Ch 62, Turn [53]
- Starting in the 2nd Ch from hook, Sl St 2, SC 2, Inc x 2, HDC Inc x 7, DC Inc x 48, Ch 2, Turn [118]
- DC 98, HDC 12, SC 5, Sl St, Ch 1, Turn [116]
- Skip the Slip Stitch, SC, Dec x 3, HDC Dec x 6, DC Dec x 48, Ch 41, Turn [58]
- Starting in the 2nd Ch from hook, Sl St 2, SC 2, Inc x 4, HDC Inc x 4, DC Inc x 30, Ch 2, Turn [76]
- DC 60, HDC 8, SC 5, Sl St, Ch 1, Turn [74]
- Skip the Slip Stitch, SC, Dec x 3, HDC Dec x 4, DC Dec x 29, Ch 39, Turn [37]
- Starting in the 2nd Ch from hook, Sl St 2, SC 2, Inc x 2, HDC Inc x 2, DC Inc x 30, Ch 2, Turn [72]
- DC 60, HDC 4, SC 5, Sl St, Ch 1, Turn [70]
- Skip the Slip Stitch, SC, Dec x 3, HDC Dec x 2, DC Dec x 29 [35]
Fasten off with 24 in/61 cm yarn tail. Pin in place along the neck and sew to attach; weave in ends.
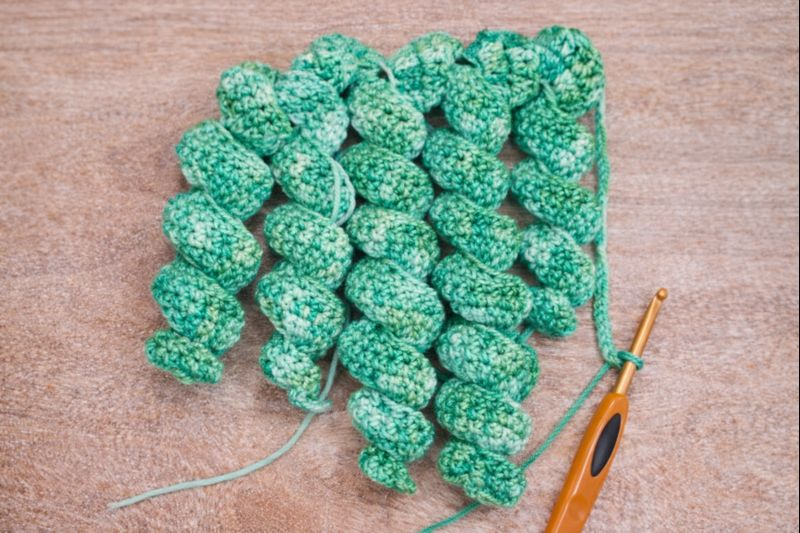
UNICORN PUFFY CLOUD TAIL (MAKE 1)
Option 1
With US size G (4 mm) crochet hook:
- Starting with a long enough yarn tail to weave in later, Ch 62, Turn, starting in the 2nd Ch from hook, Sl St, SC 2, Inc x 3, HDC Inc x 5, DC Inc x 45, HDC Inc x 3, Inc x 2, Ch 1, Turn [119]
- HDC 10, DC 90, HDC 10, SC 7, Sl St, Ch 1, Turn [117]
- Skip the Slip Stitch, SC, Dec x 3, HDC Dec x 5, DC Dec x 45, HDC Dec x 3, Dec x 2 [59]
- Repeat Rows 1–3 at least 3 more times
Fasten off with 24 in/61 cm long yarn tail. Pin in place on the rump and sew to attach; weave in ends.
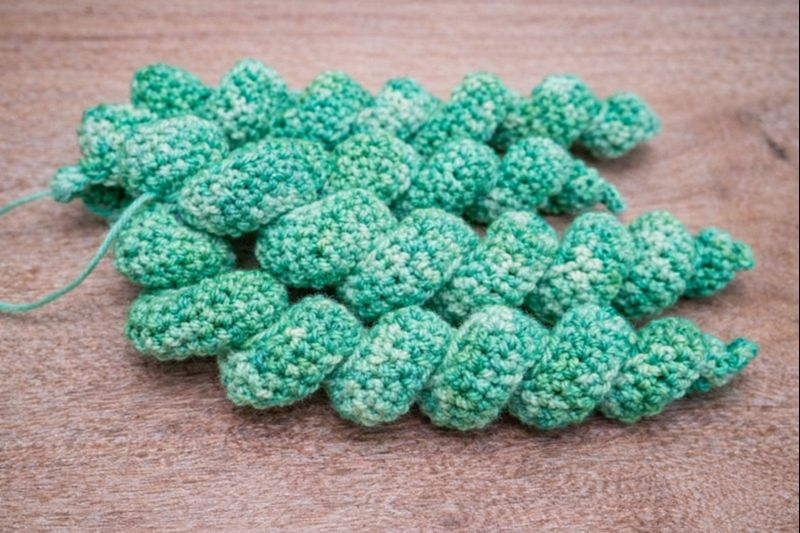
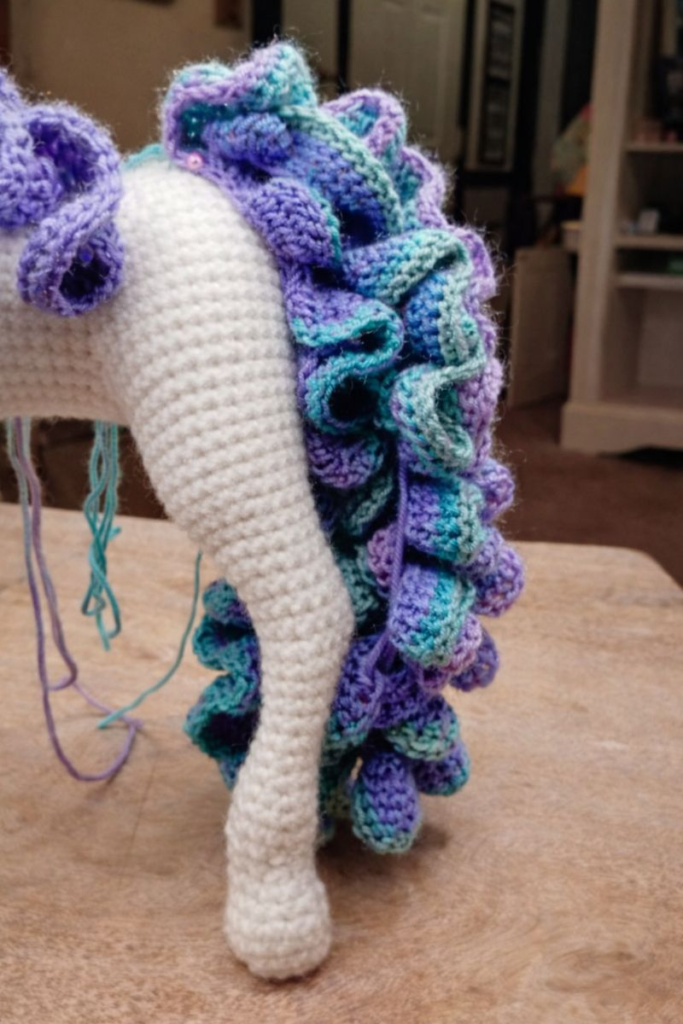
Unicorn with Puffy Cloud Tail
UNICORN RUFFLE WAVY MANE (MAKE 1)
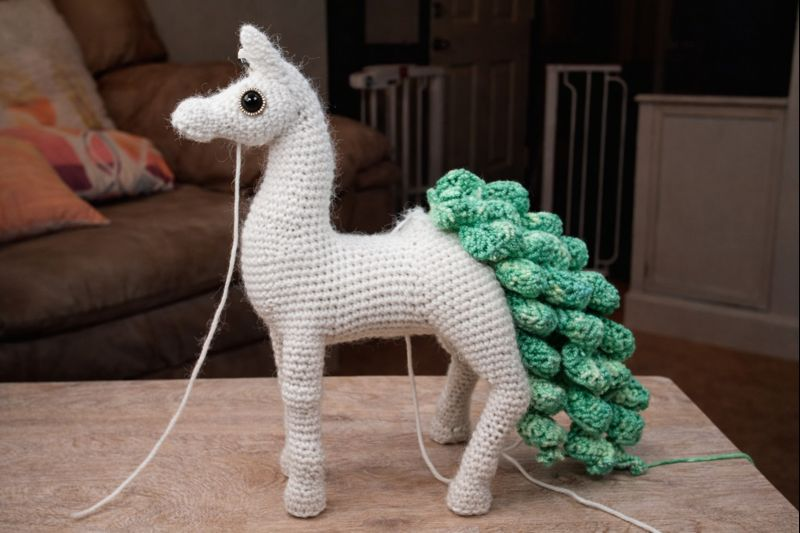
Option 2
With US size G (4 mm) crochet hook:
NOTE: A tighter tension produces a wavier mane.
- Starting with a long enough yarn tail to weave in later, Ch 37, Turn, starting in the 2nd Ch from hook, Sl St 2, SC 2, Inc x 2, HDC Inc x 2, DC Inc x 28, Ch 1, Turn [68]
| NOTE: For a simplified thinner, curly mane piece, of which you could make 2 or more whole pieces for a very full curly mane for the unicorn, just work the following rows: Row 1 (twice), Row 4 (twice), Row 7 (twice), Row 10 (twice), Row 13 (twice), and Row 16 (once), and all of the Chains that come at the end of the row just before these rows begin. Additionally, work all indicated DC stitches as HDC stitches (so all DC Increases will be HDC Increases). |
- (HDC, Inc) x 32, Sl St, Ch 1, Turn [97]
- Skip the Slip Stitch, SC 86, HDC Dec x 5, Ch 47, Turn [91]
- Starting in the 2nd Ch from hook, Sl St 2, SC 2, Inc x 2, HDC Inc x 4, DC Inc x 36, Ch 1, Turn [88]
- (HDC, Inc) x 42, Sl St, Ch 1, Turn [127]
- Skip the Slip Stitch, SC 116, HDC Dec x 5, Ch 57, Turn [121]
- Starting in the 2nd Ch from hook, Sl St 2, SC 2, Inc x 2, HDC Inc x 6, DC Inc x 44, Ch 1, Turn [108]
- (HDC, Inc) x 52, Sl St, Ch 1, Turn [157]
- Skip the Slip Stitch, SC 146, HDC Dec x 5, Ch 57, Turn [151]
- Starting in the 2nd Ch from hook, Sl St 2, SC 2, Inc x 2, HDC Inc x 6, DC Inc x 44, Ch 1, Turn [108]
- (HDC, Inc) x 52, Sl St, Ch 1, Turn [157]
- Skip the Slip Stitch, SC 146, HDC Dec x 5, Ch 41, Turn [151]
- Starting in the 2nd Ch from hook, Sl St 2, SC 2, Inc x 2, HDC Inc x 4, DC Inc x 30, Ch 1, Turn [76]
- (SC, Inc) x 36, Sl St, Ch 1, Turn [109]
- Skip the Slip Stitch, SC 98, HDC Dec x 5, Ch 37, Turn [103]
- Starting in the 2nd Ch from hook, Sl St 2, SC 2, Inc x 2, HDC Inc x 2, DC Inc x 28, Ch 1, Turn [68]
- (SC, Inc) x 32, Sl St, Ch 1, Turn [97]
- Skip the Slip stitch, SC 87, HDC Dec x 5 [92]
Fasten off with 24 in/61 cm yarn tail. Pin in place along the neck and sew to attach; weave in ends.
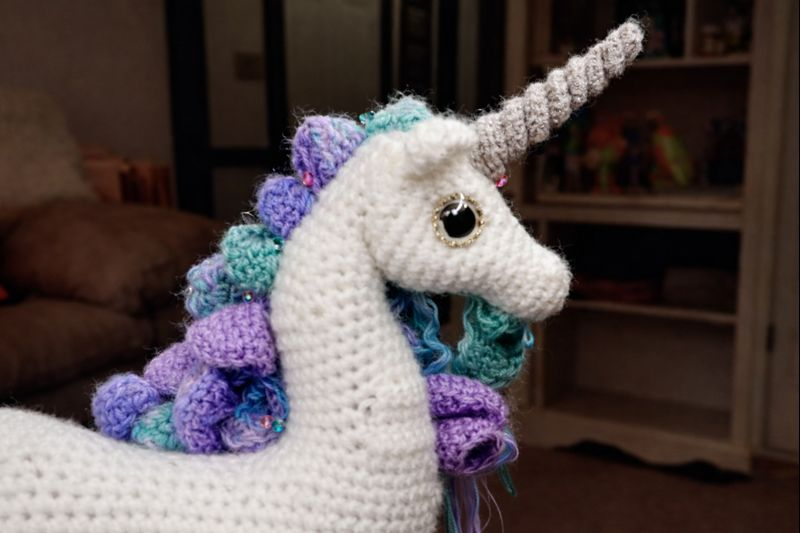
UNICORN RUFFLE WAVY TAIL (MAKE 1)
Option 2
With US size G (4 mm) crochet hook:
NOTE: A tighter tension produces a wavier tail.
- Starting with a long enough yarn tail to weave in later, Ch 62, Turn, starting in the 2nd Ch from hook, Sl St, SC 2, Inc x 3, HDC Inc x 5, DC Inc x 45, HDC Inc x 3, Inc x 2, Ch 1, Turn [119]
- (SC, Inc) x 58, Sl St, Ch 1, Turn [175]
- Skip the Slip Stitch, SC 164, Dec x 5 [169]
- Repeat Rows 1–3 at least 3 more times
Fasten off with 24 in/61 cm long yarn tail. Pin in place on the rump and sew to attach; weave in ends.
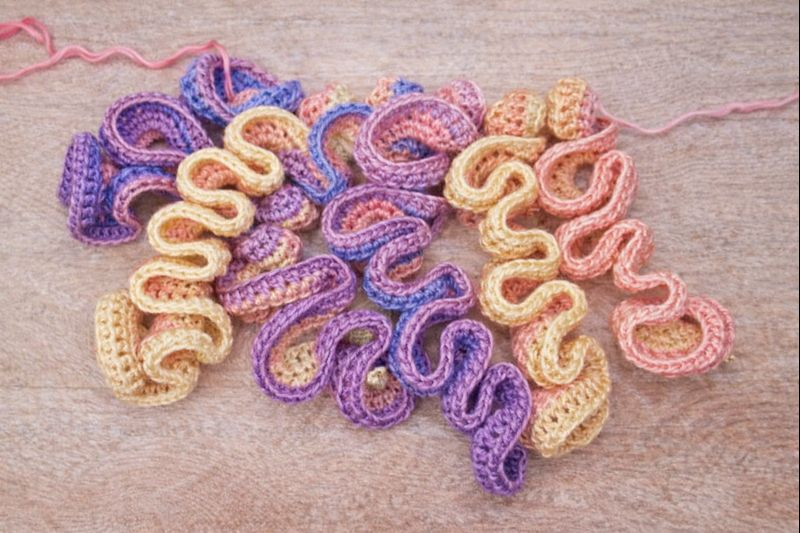
UNICORN SIMPLE HORN (MAKE 1)
Option 1
With US size G (4 mm) crochet hook:
- SC 4 in Magic Circle, continue in spiral [4]
- BLO [SC 4] [4]
- BLO [Inc, SC 3] [5]
- BLO [SC 5] [5]
- BLO [SC 5] [5]
- BLO [Inc, SC 4] [6]
- BLO [SC 6] [6]
- BLO [SC 6] [6]
- BLO [Inc, SC 5] [7]
- BLO [SC 7] [7]
- BLO [SC 7, Sl St into the next available stitch] [8]
Unicorn Simple Horn
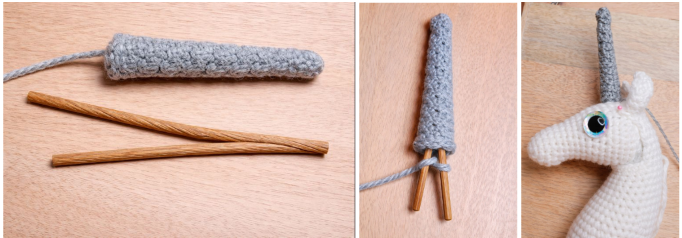
Fasten off with a 12 in/30 cm yarn tail. Pin in place on the head, sew to attach, and weave in ends.
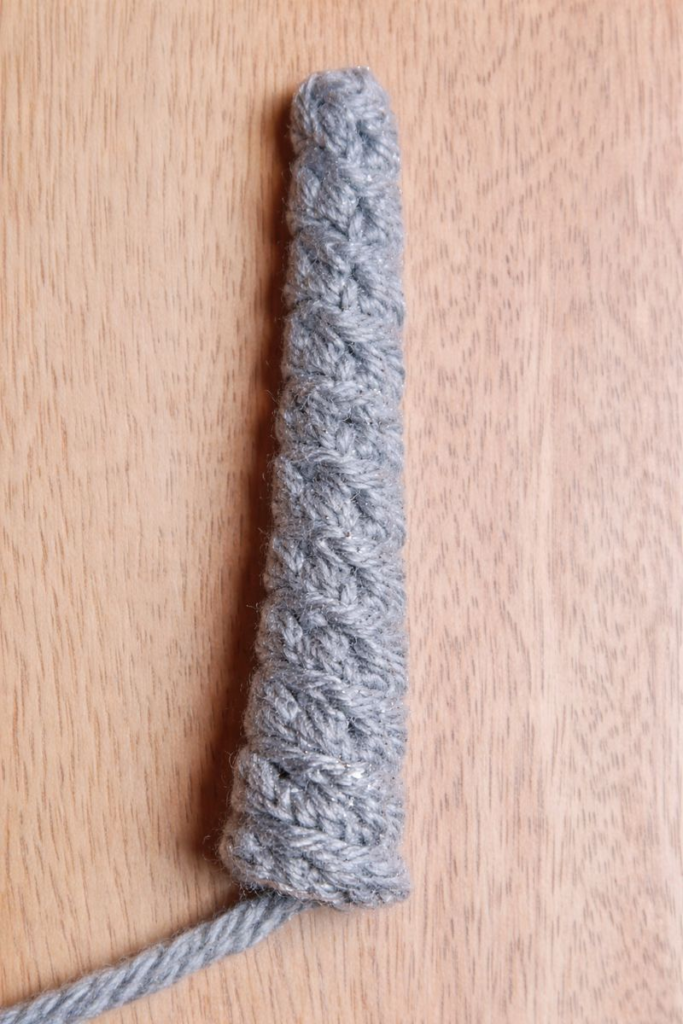
| NOTE: This piece does not require wire; you can sew to attach as is, which would be safest for a child, but the horn will be pliable and soft. If you want the horn to stand straight and firm, you can take one piece of wire about 9 in/23 cm long, fold it over on itself, and insert the bent end into the horn. |
UNICORN ADVANCED SPIRAL HORN (MAKE 1)
Option 2
With doubled-up lace or sock weight yarn (a heavier yarn will make the horn too bulky) and a US size C (2.75 mm) crochet hook:
- Start with a long enough yarn tail to weave in, Ch 54, Turn, starting in the 3rd Ch from hook, HDC Inc x 16, Inc x 10, Sl St 2, Inc x 10, HDC Inc x 14, Ch 1, Turn [102]
- HDC 3, SC 35, Sl St 10, Ch 2, Skip the 2 Slip Stitches from Row 1, Sl St 10, SC 35, HDC 7, Ch 1, Turn [109]
- Dec x 21, Dec x 5 around the slip stitches from Row 2 and into the same stitches that they were slip stitched into from Row 1, Ch 1, Slip Stitch around the entire piece encompassing the slip stitches from Row 1 and the Chains from Row 2, Ch 1, Dec x 5 around the slip stitches from Row 2 and into the same stitches that they were slip stitched into from Row 1, Dec x 19 [51]
Fasten off with 12 in/30 cm yarn tail.
At the halfway point of the piece you made, twist the horn together. It may take a couple of tries to figure it out, but it will work.
Unicorn Advanced Spiral Horn
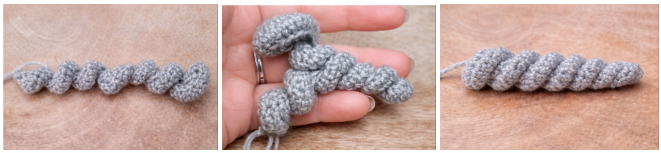
Pin in place, sew to attach, and weave in ends. The horn will be soft to the touch (child-safe), but it should stand up on its own because of its shape.
Great work—your unicorn is complete!