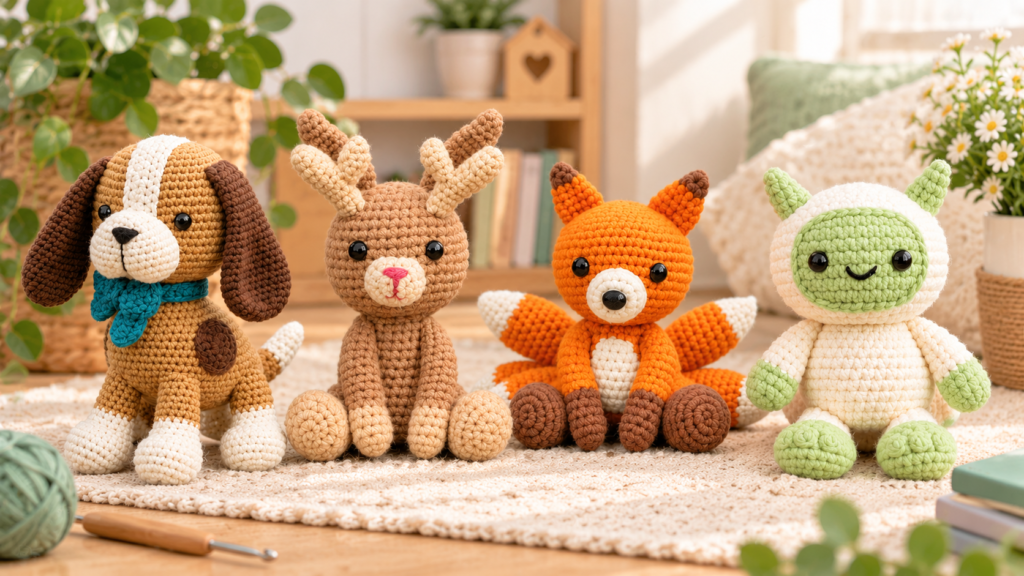
The Jackalope
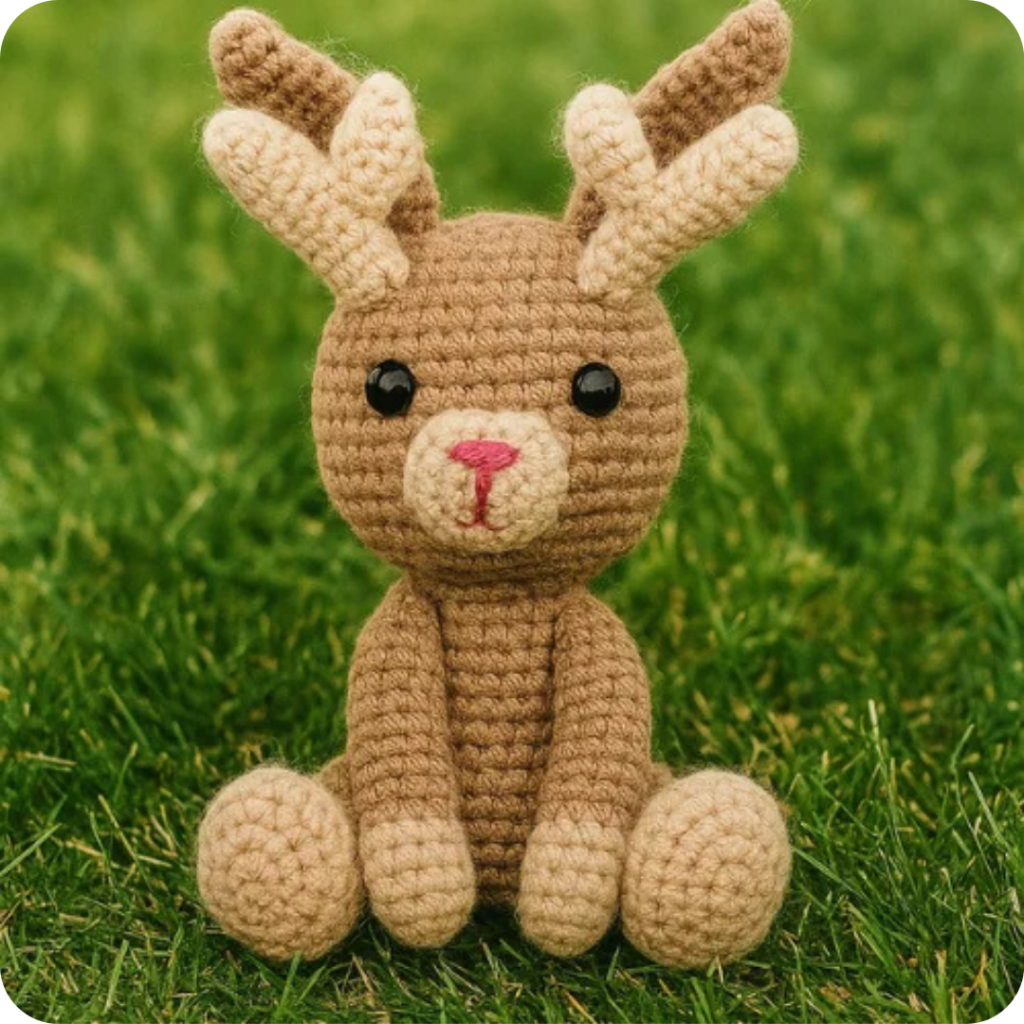
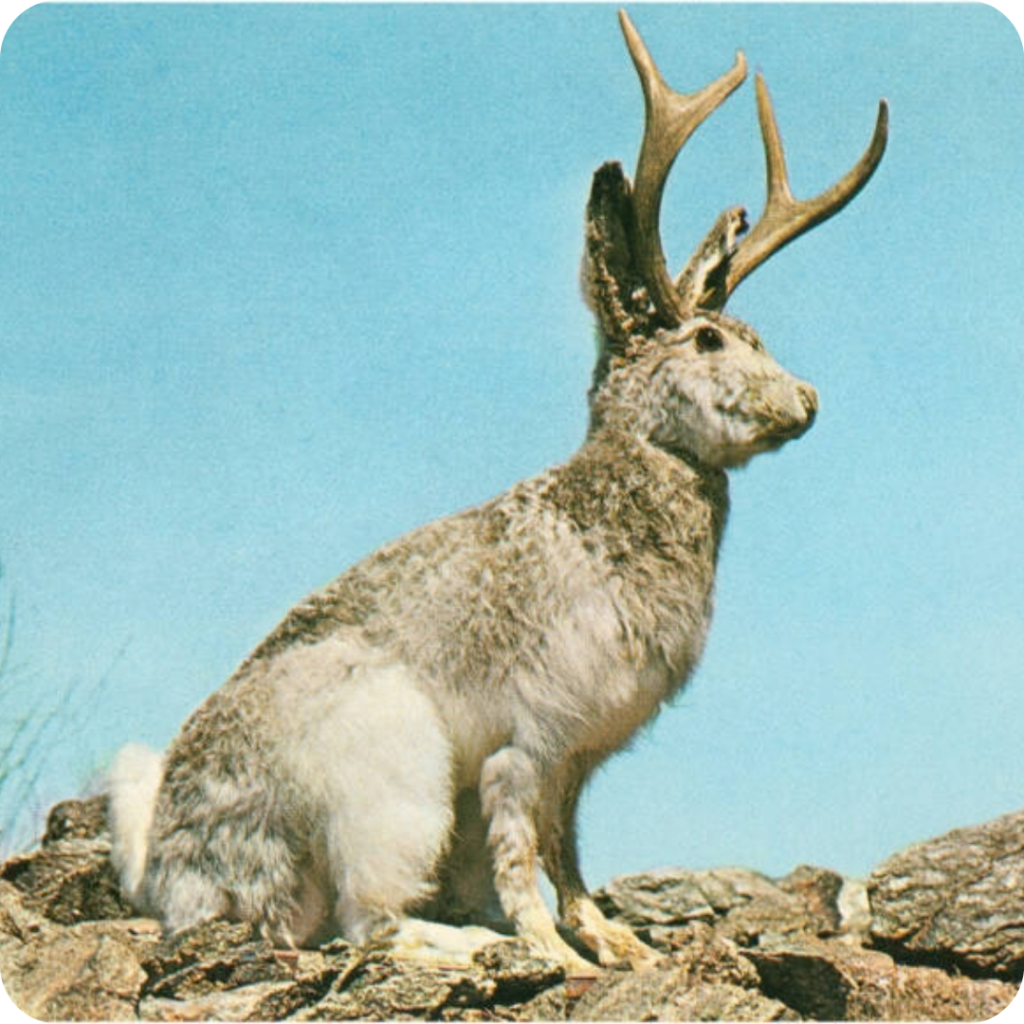
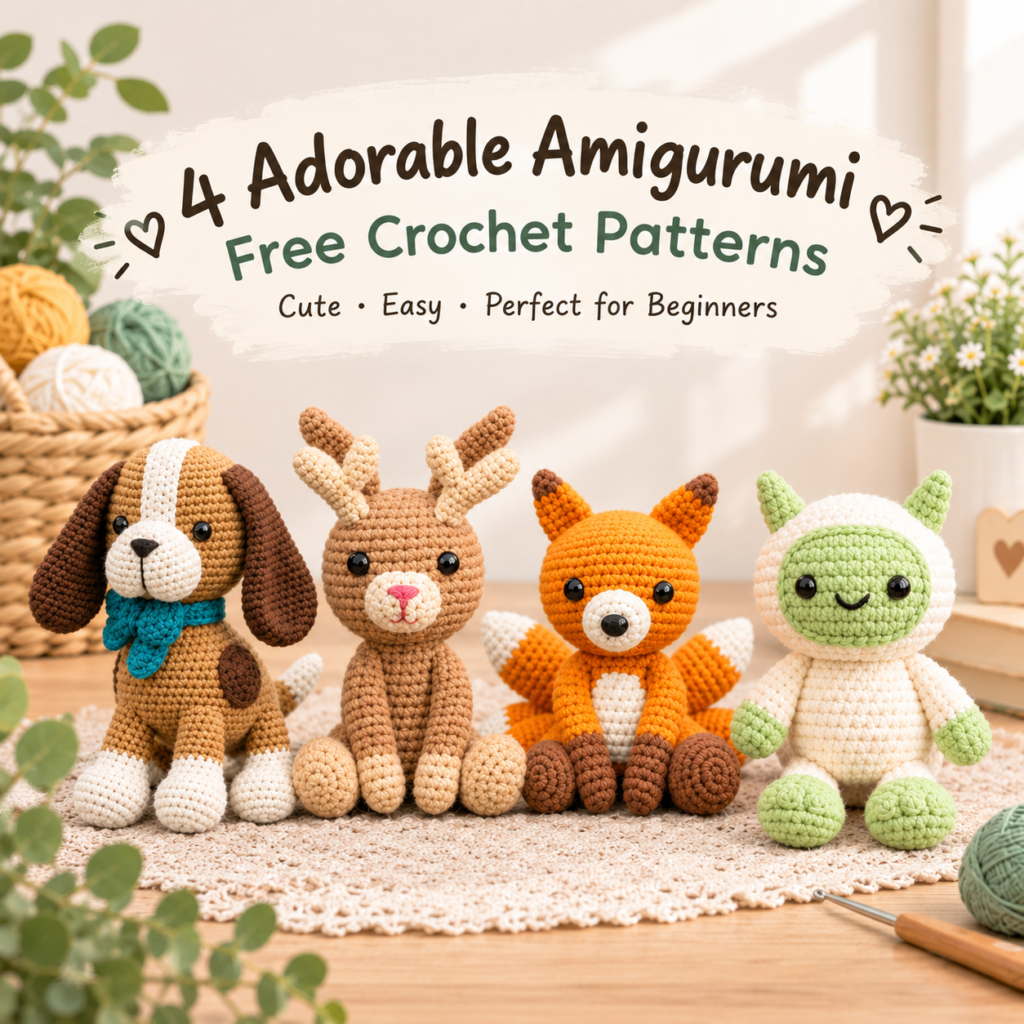
The jackalope is a mythical creature from North American folklore, said to be a jackrabbit with antelope-like horns. Often depicted as elusive and clever, it blends whimsy and wilderness, capturing imaginations with tales of its rare sightings and ability to mimic human voices.
Size:
9½ inches tall x 6 inches wide
Materials:
- Caron One Pound worsted (100% acrylic; 812 yards (742 m) / 454 g) in Taupe
- Caron One Pound in Off White
- Caron One Pound in Rose (small amount for embroidering nose)
- US 7 (4.5 mm) crochet hook
- 14 mm black safety eyes
- Polyester fiberfill
- Tapestry needle
- Stitch markers
- Scissors
Stitches Used:
Invisible decrease (dec)
Magic ring
Single crochet (sc)
Increase (inc)
Head and Body
Make 1 in Taupe
Make a magic ring.
Round 1: Sc 6 in magic ring. [6 sts]
Round 2: Inc in each st around. [12 sts]
Round 3: *Sc in the next st, inc in the next st; rep from * 5 more times. [18 sts]
Round 4: *Sc in the next 2 sts, inc in the next st; rep from * 5 more times. [24 sts]
Round 5: *Sc in the next 3 sts, inc in the next st; rep from * 5 more times. [30 sts]
Round 6: *Sc in the next 4 sts, inc in the next st; rep from * 5 more times. [36 sts]
Round 7: *Sc in the next 5 sts, inc in the next st; rep from * 5 more times. [42 sts] Rounds 8–15: Sc in each st around. [8 rounds @ 42 sts] Insert 14 mm safety eyes between Rounds 11 and 12, 8 sts apart.
Round 16: *Sc in the next 5 sts, dec; rep from * 5 more times. [36 sts]
Round 17: *Sc in the next 4 sts, dec; rep from * 5 more times. [30 sts]
Begin stuffing the head and continue stuffing as you work the next few rounds.
Round 18: *Sc in the next 3 sts, dec; rep from * 5 more times. [24 sts]
Round 19: *Sc in the next 2 sts, dec; rep from * 5 more times. [18 sts]
Round 20: *Sc in the next st, dec; rep from * 5 more times. [12 sts] You’ve now finished the head and will begin increasing to make the body.
Round 21: *Sc in the next st, inc in the next st; rep from * 5 more times. [18 sts]
Round 22: *Sc in the next 2 sts, inc in the next st; rep from * 5 more times. [24 sts]
Rounds 23–27: Sc in each st around. [5 rounds @ 24 sts]
Round 28: *Sc in the next 3 sts, inc in the next st; rep from * 5 more times. [30 sts]
Rounds 29–31: Sc in each st around. [3 rounds @ 30 sts] Make sure the head is fully stuffed and begin stuffing the shoulders; continue stuffing as you work the remaining rounds.
Round 32: *Sc in the next 3 sts, dec; rep from * 5 more times. [24 sts]
Round 33: *Sc in the next 2 sts, dec; rep from * 5 more times. [18 sts]
Round 34: *Sc in the next st, dec; rep from * 5 more times. [12 sts]
Round 35: Dec in each pair of st around. [6 sts] Fasten off the yarn, leaving a short tail of 6 to 8 inches for closing the body. Add any extra stuffing, then use a tapestry needle to weave the tail through the front loops of the last round. Pull the tail tight to close the body and weave in the end, then set aside.
Snout
Make 1 in Off White Make a magic ring. Round 1: Sc 6 in magic ring. [6 sts]
Round 2: *Sc 3 in the next st, inc in the next st, sc in the next st; rep from * 1 more time. [12 sts]
Round 3: Sc in the next st, inc in the next 3 sts, sc in the next 3 sts, inc in the next 3 sts, sc in the next 2 sts. [18 sts]
Fasten off the yarn, leaving a medium tail of 14 to 16 inches for attaching to the head, then set aside.
Ears
Make 2 in Taupe
Make a magic ring.
Round 1: Sc 6 in magic ring. [6 sts]
Round 2: *Sc in the next 2 sts, inc in the next st; rep from * 1 more time. [8 sts]
Round 3: Sc in each st around. [8 sts]
Round 4: *Sc in the next 3 sts, inc; rep from * 1 more time. [10 sts]
Round 5: Sc in each st around. [10 sts]
Round 6: *Sc in the next 4 sts, inc in the next st; rep from * 1 more time. [12 sts]
Round 7: Sc in each st around. [12 sts]
Round 8: *Sc in the next 5 sts, inc in the next st; rep from * 1 more time. [14 sts]
Round 9: Sc in each st around. [14 sts]
Round 10: *Sc in the next 6 sts, inc in the next st; rep from * 1 more time. [16 sts]
Round 11: Sc in each st around. [16 sts]
Round 12: *Sc in the next 7 sts, inc in the next st; rep from * 1 more time. [18 sts]
Round 13: Sc in each st around. [18 sts]
Round 14: *Sc in the next st, dec; rep from * 5 more times. [12 sts]
Fasten off the yarn, leaving a medium tail of 14 to 16 inches for sewing the ear closed and attaching it to the head. Press the ear flat so the bottom edge lines up and use a tapestry needle and the tail to stitch it closed. Fold the closed bottom edge of the ear in half and stitch the sides together to create a curve in the ear, then set aside.
Antlers
Make 2 in Off White
Long Piece
Make a magic ring.
Round 1: Sc 6 in magic ring. [6 sts]
Round 2: *Sc in the next 2 sts, inc in the next st; rep from * 1 more time. [8 sts]
Rounds 3–12: Sc in each st around. [10 rounds @ 8 sts]
Fasten off the yarn, leaving a medium tail for attaching to the head, then set aside.
Short Piece
Round 1: Sc 6 in magic ring. [6 sts]
Round 2: *Sc in the next 2 sts, inc in the next st; rep from * 1 more time. [8 sts]
Rounds 3–5: Sc in each st around. [3 rounds @ 8 sts]
Fasten off the yarn, leaving a medium tail for attaching to the long piece of the antler, then set aside.
Arms
Make 2
Make a magic ring in Off White.
Round 1: Sc 5 in magic ring. [5 sts]
Round 2: Inc in each st around. [10 sts]
Rounds 3–5: Sc in each st around. [3 rounds @ 10 sts]
On the last st of Round 5, change to Taupe.
Rounds 6–16: Sc in each st around. [11 rounds @ 10 sts]
Round 17: Dec in each pair of st around. [5 sts]
Stuff the arms as you go, using just enough stuffing that they can keep their shape while remaining supple and pliable.
Fasten off the yarn, leaving a medium tail for closing the arm and attaching it to the body. Use a tapestry needle to weave the tail through the front loops of the last round. Pull the tail tight to close the arm, then set aside.
Legs
Make 2
Make a magic ring in Off White.
Round 1: Sc 6 in magic ring. [6 sts]
Round 2: *Sc 3 in the next st, inc in the next st, sc in the next st; rep from * 1 more time. [12 sts]
Round 3: Sc in the next st, inc in the next 3 sts, sc in the next 3 sts, inc in the next st 3 sts, sc in the next 2 sts. [18 sts]
Rnd 4: Sc in the next st, *sc in the next st, inc in the next st; rep from * 2 more times; sc in the next 3 sts, *sc in the next st, inc in the next st; rep from * 2 more times; sc in the next 2 sts. [24 sts]
Rounds 5–7: Sc in each st around. [3 rounds @ 24 sts]
Round 8: Dec in the next 6 pairs of st, sc in the next 12 sts. [18 sts]
Round 9: *Sc in the next st, dec; rep from * 5 more times. [12 sts]
On last st of Round 9, change to Taupe.
You’ve completed the foot. Add a little bit of stuffing and continue to stuff as you work the leg.
Rounds 10–17: Sc in each st around. [8 rounds of 12 sts]
Finish stuffing the leg.
Round 18: Dec in each pair of st around. [6 sts]
Fasten off the yarn, leaving a medium tail for closing the leg and attaching it to the body. Use a tapestry needle to weave the tail through the front loops of the last round. Pull the tail tight to close the leg, then set aside.
Tail
Make 1 in Off White
Make a magic ring.
Round 1: Sc 6 in magic ring. [6 sts]
Round 2: Inc in each st around. [12 sts]
Rounds 3–4: Sc in each st around. [2 rounds @ 12 sts]
Round 5: Dec in each pair of st around. [6 sts]
Fasten off the yarn, leaving a medium tail for attaching to the body. Use the handle side of your hook to poke a little bit of stuffing into the Jackalope tail, then use a tapestry needle to weave the yarn tail through the front loops of the last round. Pull the yarn tail tight to close the tail, then set aside.
Assembly
Gather all the pieces, a tapestry needle, and a pair of scissors.
- Attach the snout (no need to stuff), lining it up so the top edge sits on the round below the eyes and the snout is centered on the face.
- Take a medium strand of Rose yarn and use a tapestry needle to embroider the nose. The top portion of the nose should be 2 sts wide between Rounds 2 and 3 of the snout. To give the nose a T shape, make one vertical line down the center of the nose, about 3 sts long, before making multiple horizontal passes at the top of that line.
- Attach the ears about 4 rounds from the top of the head, with the inside curve of the ear facing forward.
- Stuff and attach the long pieces of the antlers, lining them up so the bottom edge is 3 rounds above the tops of the eyes.
- Stuff and attach the short pieces of the antlers, lining them up about halfway up on the inside of the long pieces of the antlers.
- Set your Jackalope on a flat surface. Grab one of the legs, set it on the flat surface with the foot pointing up, and place it next to the body. With the leg positioned so the foot is out in front of the body, stitch the top edge of the leg to the side of the body. The top of the leg should be around 7 sts away from the center of the belly. Repeat these steps on the other side with the second leg.
- With the Jackalope still sitting on the flat surface, grab one of the arms. Set the bottom of the arm on the flat surface in between the legs. Lean the arm against the body so the top of the arm sits between where the leg is attached and the head; stitch the top edge where it connects to the body. Repeat these steps on the other side with the second arm.
- With your Jackalope still sitting on a flat surface, set the tail on the flat surface, place it at the center back of the body, and attach it.
The Kitsune
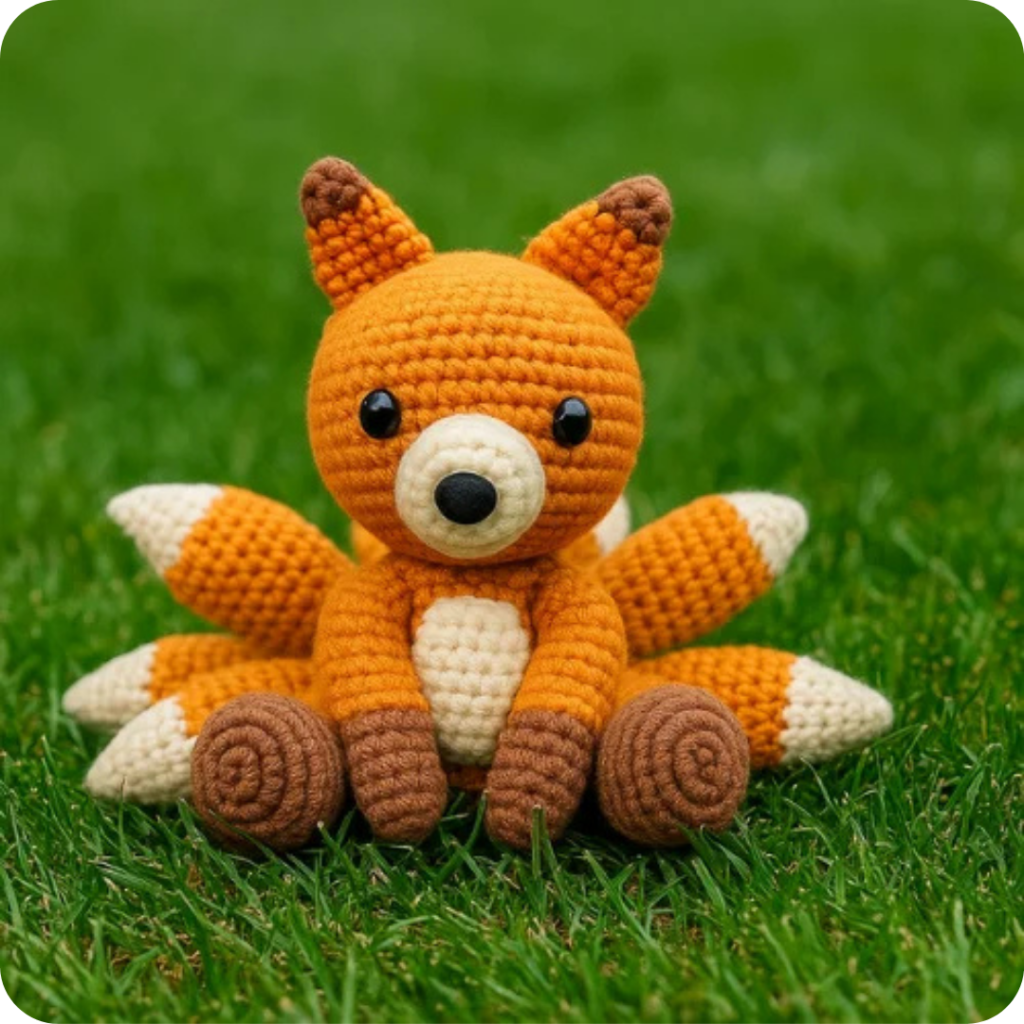

The Kitsune is a mythical fox from Japanese folklore, known for its intelligence, magical abilities, and multiple tails—gaining more as it grows older and wiser. Often portrayed as a shape-shifter, it can appear as a beautiful human, trickster, or guardian spirit, embodying both mischievous and protective traits.
Size:
7 inches tall x 9 inches wide
Materials:
- Red Heart with Love worsted (100% acrylic; 370 yards (338 m) / 198 g) in Tangerine
- Red Heart Super Saver worsted (100% acrylic; 364 yards (333 m) / 198 g) in Soft White
- Red Heart Super Saver in Café Latte
- Red Heart Super Saver in Black (small amount for embroidering nose)
- US G-6 (4 mm) crochet hook
- 14 mm black safety eyes
- Polyester fiberfill
- Tapestry needle
- Stitch markers
- Scissors
Stitches Used:
- Magic ring
- Single crochet (sc)
- Increase (inc)
- Invisible decrease (dec)
Head and Body
Make 1 in Tangerine
Make a magic ring.
Round 1: Sc 6 in magic ring. [6 sts]
Round 2: Inc in each st around. [12 sts]
Round 3: *Sc in the next st, inc in the next st; rep from * 5 more times. [18 sts]
Round 4: *Sc in the next 2 sts, inc in the next st; rep from * 5 more times. [24 sts]
Round 5: *Sc in the next 3 sts, inc in the next st; rep from * 5 more times. [30 sts]
Round 6: *Sc in the next 4 sts, inc in the next st; rep from * 5 more times. [36 sts]
Round 7: *Sc in the next 5 sts, inc in the next st; rep from * 5 more times. [42 sts]
Rounds 8–15: Sc in each st around. [8 rounds @ 42 sts]
Insert 14 mm safety eyes between Rounds 11 and 12, 9 sts apart.
Round 16: *Sc in the next 5 sts, dec; rep from * 5 more times. [36 sts]
Round 17: *Sc in the next 4 sts, dec; rep from * 5 more times. [30 sts]
Begin stuffing the head and continue stuffing as you work the next few rounds.
Round 18: *Sc in the next 3 sts, dec; rep from * 5 more times. [24 sts]
Round 19: *Sc in the next 2 sts, dec; rep from * 5 more times. [18 sts]
Round 20: *Sc in the next st, dec; rep from * 5 more times. [12 sts]
You’ve now finished the head and will begin increasing to make the body.
Round 21: *Sc in the next st, inc in the next st; rep from * 5 more times. [18 sts]
Round 22: *Sc in the next 2 sts, inc in the next st; rep from * 5 more times. [24 sts]
Rounds 23–27: Sc in each st around. [5 rounds @ 24 sts]
Round 28: *Sc in the next 3 sts, inc in the next st; rep from * 5 more times. [30 sts]
Rounds 29–31: Sc in each st around. [3 rounds @ 30 sts]
Make sure the head is fully stuffed and begin stuffing the shoulders; continue stuffing as you work the remaining rounds.
Round 32: *Sc in the next 3 sts, dec; rep from * 5 more times. [24 sts]
Round 33: *Sc in the next 2 sts, dec; rep from * 5 more times. [18 sts]
Round 34: *Sc in the next st, dec; rep from * 5 more times. [12 sts]
Round 35: Dec in each pair of st around. [6 sts]
Fasten off the yarn, leaving a short tail of 6 to 8 inches for closing the body. Add any extra stuffing, then use a tapestry needle to weave the tail through the front loops of the last round. Pull the tail tight to close the body and weave in the end, then set aside.
Snout
Make 1 in Soft White
Make a magic ring.
Round 1: Sc 6 in magic ring. [6 sts]
Round 2: *Sc in the next 2 sts, inc in the next st; rep from * 1 more time. [8 sts]
Round 3: *Sc in the next 3 sts, inc in the next st; rep from * 1 more time. [10 sts]
Round 4: *Sc in the next 4 sts, inc in the next st; rep from * 1 more time. [12 sts]
Round 5: *Sc in the next st, inc in the next st; rep from * 5 more times. [18 sts]
Rounds 6-7: Sc in each st around. [2 rounds @ 18 sts]
Fasten off the yarn, leaving a medium tail of 14 to 16 inches for attaching to the head, then set aside.
Ears
Make 2
Make a magic ring in Café Latte.
Round 1: Sc 6 in magic ring. [6 sts]
Round 2: *Sc in the next 2 sts, inc in the next st; rep from * 1 more time. [8 sts]
Round 3: Sc in each st around. [8 sts]
On last stitch of Round 3, change to Tangerine.
Round 4: *Sc in the next 3 sts, inc in the next st; rep from * 1 more time. [10 sts]
Round 5: Sc in each st around. [10 sts]
Round 6: *Sc in the next 4 sts, inc in the next st; rep from * 1 more time. [12 sts]
Round 7: Sc in each st around. [12 sts]
Fasten off the yarn, leaving a medium tail for closing the ear and attaching it to the body. Press the ear flat and stitch it closed, then set aside.
Belly
Make 1 in Soft White
Make a magic ring.
Round 1: Sc 6 in magic ring. [6 sts]
Round 2: *Sc 3 in the next st, inc in the next st, sc in the next st; rep from * 1 more time. [12 sts]
Round 3: Sc in the next st, inc in the next 3 sts, sc in the next 3 sts, inc in the next 3 sts, sc in the next 2 sts. [18 sts]
Round 4: Sc in the next st, *sc in the next st, inc in the next st; rep from * 2 more times, sc in the next 3 sts, *sc in the next st, inc in the next st; rep from * 2 more times; sc in the next 2 sts. [24 sts]
Fasten off the yarn, leaving a medium tail for attaching to the body, then set aside.
Arms
Make 2
Make a magic ring in Café Latte.
Round 1: Sc 5 in magic ring. [5 sts]
Round 2: Inc in each st around. [10 sts]
Rounds 3–8: Sc in each st around. [6 rounds @ 10 sts]
On the last st of Round 8, change to Tangerine.
Rounds 9–16: Sc in each st around. [8 rounds @ 10 sts]
Round 17: Dec in each pair of st around. [5 sts]
Stuff the arms as you go, using just enough stuffing that they can keep their shape while remaining supple and pliable.
Fasten off the yarn, leaving a medium tail for closing the arm and attaching it to the body. Use a tapestry needle to weave the tail through the front loops of the last round. Pull the tail tight to close the arm, then set aside.
Legs
Make 2
Make a magic ring in Café Latte.
Round 1: Sc 6 in magic ring. [6 sts]
Round 2: *Sc 3 in the next st, inc in the next st, sc in the next st; rep from * 1 more time. [12 sts]
Round 3: Sc in the next st, inc in the next 3 sts, sc in the next 3 sts, inc in the next 3 sts, sc in the next 2 sts. [18 sts]
Round 4: Sc in the next st, *sc in the next st, inc in the next st; rep from * 2 more times; sc in the next 3 sts, *sc in the next st, inc in the next st; rep from * 2 more times; sc in the next 2 sts. [24 sts]
Rounds 5–7: Sc in each st around. [3 rounds @ 24 sts]
Round 8: Dec in the next 6 pairs of st, sc in the next 12 sts. [18 sts]
Round 9: *Sc in the next st, dec; rep from * 5 more times. [12 sts]
You’ve completed the foot. Add a little bit of stuffing and continue to stuff as you work the leg.
Rounds 10-11: Sc in each st around. [2 rounds @ 12 sts]
On last st of Round 11, change to Tangerine.
Rounds 12-17: Sc in each st around. [6 rounds of 12 sts]
Finish stuffing the leg.
Round 18: Dec in each pair of st around. [6 sts]
Fasten off the yarn, leaving a medium tail for closing the leg and attaching it to the body. Use a tapestry needle to weave the tail through the front loops of the last round. Pull the tail tight to close the leg, then set aside.
Tails
Make 9
Make a magic ring in Soft White.
Round 1: Sc 6 in magic ring. [6 sts]
Round 2: *Sc in the next 2 sts, inc in the next st; rep from * 1 more time. [8 sts]
Round 3: Sc in each st around. [8 sts]
Round 4: *Sc in the next st, inc in the next st; rep from *3 more times. [12 sts]
Round 5: Sc in each st around. [12 sts]
On the last st of Round 5, change to Tangerine.
Round 6: *Sc in the next st, inc in the next st; rep from *5 more times. [18 sts]
Rounds 7–9: Sc in each st around. [3 rounds @ 18 sts]
Round 10: *Sc in the next 7 sts, dec; rep from *1 more time. [16 sts]
Rounds 11–12: Sc in each st around. [2 rounds @ 16 sts]
Begin stuffing the tail and continue to stuff as you work the remaining rounds.
Round 13: *Sc in the next 6 sts, dec; rep from *1 more time. [14 sts]
Rounds 14–15: Sc in each st around. [2 rounds @ 14 sts]
Round 16: *Sc in the next 5, dec; rep from *1 more time. [12 sts]
Rounds 17–18: Sc in each st around. [2 rounds @ 12 sts]
Finish stuffing the tail.
Round 19: Dec in each pair of st around. [6 sts]
Fasten off the yarn, leaving a medium tail for closing the Kitsune tail and attaching it to the body. Use a tapestry needle to weave the yarn tail through the
front loops of the last round; pull the yarn tail tight to close the tail, then set aside.
Assembly
Gather all the pieces, a tapestry needle, and a pair of scissors.
- Stuff and attach the snout, lining it up so the top edge sits on the round below the eyes and the snout is centered on the face.
- Take a medium strand of Black yarn and use the tapestry needle to make multiple passes about 1 st long on the tip of the snout, creating a little black nose.
- Attach the ears about 3 rounds from the top of the head, stitching along the bottom of the ear with the brown tip pointing up.
- Attach the belly piece centered on the body.
- Set your Kitsune on a flat surface. Grab one of the legs, set it on the flat surface with the foot pointing up, and place it next to the body. With the leg positioned so the foot is out in front of the body, stitch the top edge of the leg to the side of the body. The top of the leg
should be around 5 sts away from the belly.
Repeat these steps on the other side with the second leg.
- With the Kitsune still sitting on the flat surface, grab one of the arms. Set the bottom of the arm on the flat surface in between the legs. Lean the arm against the body so the top of the arm sits to the outside of the belly piece; stitch the top edge where it connects to the body. Repeat these steps on the other side of the belly piece with the second arm.
- With your Kitsune still sitting on a flat surface, set tail 1 on the flat surface, place it at the center back of the body, and attach it. Secure the base of the tail with several stitches.
- For tails 2 and 3, place them on either side of tail 1 and attach the bases as close to the base of tail 1 as you can.
- Repeat the process with tails 4 and 5 on the outside of tails 2 and 3. The back of your Kitsune should now have a row of 5 tails attached close together at the base so the ends fan out.
- Attach tails 6 to 9 to the round of the body above the first row of tails, so they sit in the spaces between the first row of tails.
The Poodles
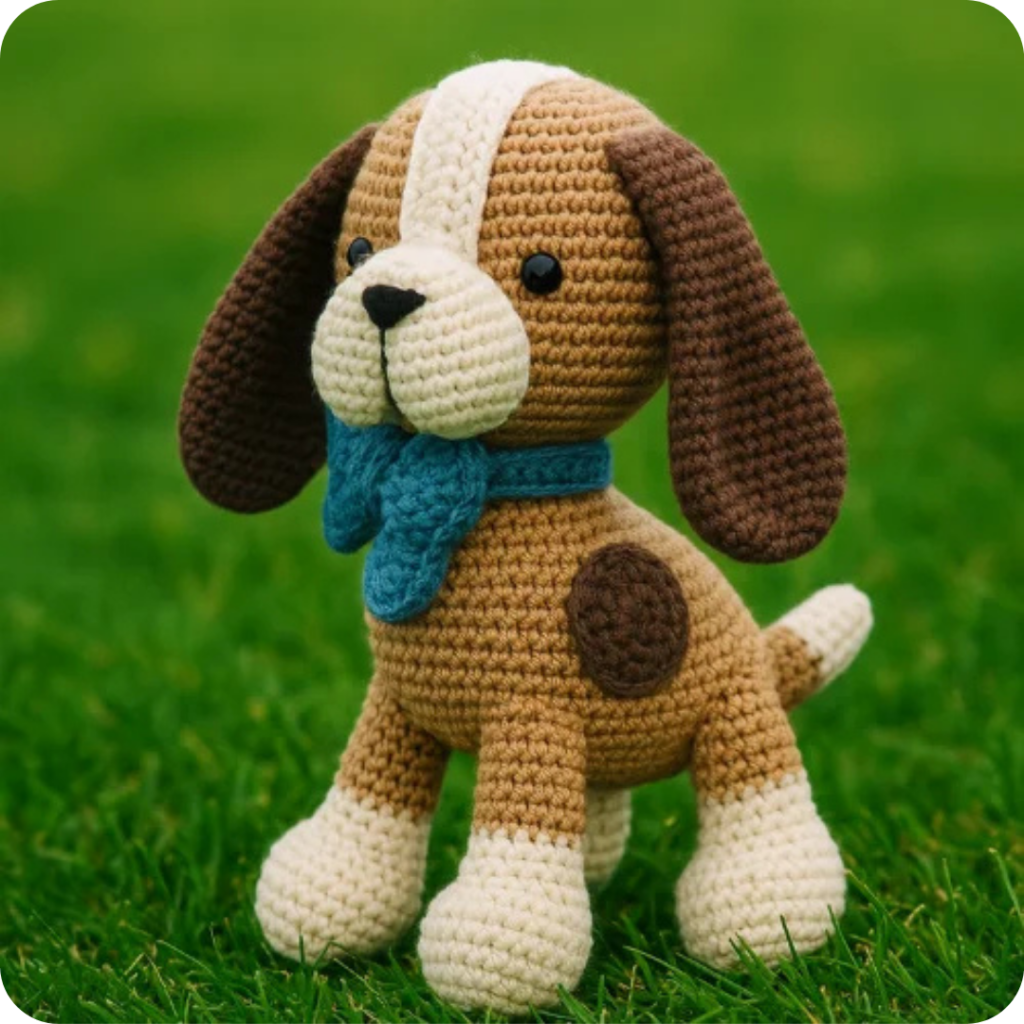

Poodles are highly intelligent and trainable dogs known for their curly, hypoallergenic coats. They are active companions that come in a variety of sizes and are admired for their elegant appearance and friendly nature.
Size:
7 inches tall
Materials Needed
- Yarn:
- Fingering weight yarn (DMC Natura Just Cotton 509/155 m):
- Light Brown – Canelle 37 (2 separate balls)
- Dark Brown – Ombre 39
- Off-White – Nacar 35
- Dark Blue – Blue Jeans 26
- Fingering weight yarn (DMC Natura Just Cotton 509/155 m):
- Hook:
- B-1 / 2.5 mm crochet hook
- Accessories:
- Safety eyes (6 mm)
- Black embroidery thread (DMC Cotton Embroidery Floss)
- Yarn needle
- Stitch markers
- Fiberfil
HEAD (in light brown yarn)
Round 1: start 6 sc in a magic ring [6]
Round 2: inc in all 6 st [12]
Round 3: {sc in next st, inc in next st} repeat 6 times [18]
Round 4: {sc in next 2 st, inc in next st} repeat 6 times [24]
Round 5: {sc in next 3 st, inc in next st} repeat 6 times [30]
Round 6: {sc in next 4 st, inc in next st} repeat 6 times [36]
Round 7: {sc in next 5 st, inc in next st} repeat 6 times [42]
Round 8: {sc in next 6 st, inc in next st} repeat 6 times [48]
Round 9: {sc in next 7 st, inc in next st} repeat 6 times [54]
Round 10 – 14: sc in all 54 st [54]
Round 15: {sc in next 8 st, inc in next st} repeat 6 times [60]
Round 16: {sc in next 14 st, inc in next st} repeat 4 times [64]
Round 17 – 20: sc in all 64 st [64]
Round 21: {sc in next 14 st, dec} repeat 4 times [60]
Round 22: {sc in next 8 st, dec} repeat 6 times [54]
Round 23: {sc in next 7 st, dec} repeat 6 times [48]
Round 24: {sc in next 6 st, dec} repeat 6 times [42]
Rnd 25: {sc in next 5 st, dec} repeat 6 times [36]
Round 26: {sc in next 4 st, dec} repeat 6 times [30]
Insert the safety eyes between rounds 15 and 16, 11 stitches apart. Stuff the head firmly with fiberfill. Using a single strand of black thread, embroider eyebrows above each eye over rounds 14 and 15, with each eyebrow being approximately 2 stitches wide.
Round 27: {sc in next 3 st, dec} repeat 6 times [24]
Round 28: dec 12 times [12]
Finish stuffing the head.
Round 29: dec 6 times [6]
Slst in next st. Fasten off, leaving a yarn tail. Using your yarn needle, weave the yarn tail through the front loop of each remaining stitch and pull it tight to close. Weave in the yarn end.
MUZZLE (in off-white yarn)
Round 1: start 6 sc in a magic ring [6]
Round 2: inc in all 6 st [12]
Round 3: {sc in next st, inc in next st} repeat 6 times [18]
Round 4: {sc in next 2 st, inc in next st} repeat 6 times [24]
Split round 4 into two equal sides of 12 stitches each and continue crocheting Part A and B of the muzzle. The 12th stitch of round 4 is marked with a blue marker in.
PART A (LEFT SIDE)
Round 5: skip next 12 st, start in the 13th st of round 4, sc in next 12 st [12]
Round 6: {sc in next 3 st, inc in next st} repeat 3 times [15]
Round 7: {sc in next 4 st, inc in next st} repeat 3 times [18]
Round 8 – 11: sc in all 18 st [18]
Round 12: {sc in next st, dec} repeat 6 times [12]
Stuff Part A of the muzzle with fiberfill.
Round 13: dec 6 times [6]
Slst in next st. Fasten off, leaving a yarn tail. Using your yarn needle, weave the yarn tail through the front loop of each remaining stitch and pull it tight to close. Bring out the yarn tail between rounds 10 and 11, along the side that will be sewn to Part B later.
PART B (RIGHT SIDE)
Leave a long starting yarn tail.
Round 5: pull up a loop of off-white yarn in the first st of round 4, start in the same st in which you joined the yarn and with the top of the muzzle pointing towards you, sc in next 12 st [12]
Round 6: {sc in next 3 st, inc in next st} repeat 3 times [15]
Round 7: {sc in next 4 st, inc in next st} repeat 3 times [18]
Round 8 – 11: sc in all 18 st [18]
Round 12: (sc in next st, dec) repeat 6 times [12]
Stuff Part B of the muzzle with fiberfill.
Round 13: dec 6 times [6]
Slst in next st. Fasten off, leaving a yarn tail. Using your yarn needle, weave the yarn tail through the front loop of each remaining stitch and pull it tight to close. Bring out the yarn tail between rounds 10 and 11, on the back side of the muzzle.
Using black thread, embroider the nose and mouth. The nose should be sewn over round 4 of the muzzle, and the bottom of the nose should go through the part where Parts A and B meet. The top of the nose should be 3 stitches wide . Use the yarn tail left on Part A to sew the right and left sides of the muzzle together. Fasten off and weave in the yarn end.
Vertically loop black thread from the base of the nose around the middle of the muzzle and fasten off at the back.
HEAD STRIPE (in off-white yarn)
Ch 20. Stitches are worked around both sides of the foundation chain.
Round 1: skip first ch on the hook, sc in next 18 ch, 3 sc in next ch. Continue on the other side of the foundation chain, sc in next 17 ch, inc in next ch [40]
Round 2: inc in next st, sc in next 12 st, hdc in next 4 st, dc in next st, 2 dc in next 3 st, dc in next st, hdc in next 4 st, sc in next 12 st, inc in next 2 st [46]
Slst in next st. Fasten off, leaving a long tail for sewing.
EAR (make 2, in dark brown yarn)
Round 1: start 6 sc in a magic ring [6]
Round 2: inc in all 6 st [12]
Round 3: (sc in next st, inc in next st) repeat 6 times [18]
Round 4: (sc in next 2 st, inc in next st) repeat 6 times [24]
Round 5: (sc in next 3 st, inc in next st) repeat 6 times [30]
Round 6: (sc in next 4 st, inc in next st) repeat 6 times [36]
Round 7 – 10: sc in all 36 st [36]
Round 11: {sc in next 10 st, dec} repeat 3 times [33]
Round 12: sc in all 33 st [33]
Round 13: {sc in next 9 st, dec} repeat 3 times [30]
Round 14: sc in all 30 st [30]
Round 15: {sc in next 8 st, dec} repeat 3 times [27]
Round 16: sc in all 27 st [27]
Round 17: {sc in next 7 st, dec} repeat 3 times [24]
Round 18: {sc in next 6 st, dec} repeat 3 times [21]
Round 19: {sc in next 5 st, dec} repeat 3 times [18]
Round 20: {dec, sc in next 7 st} repeat 2 times [16]
Round 21: sc in all 16 st [16]
Round 22: dec, sc in next 14 st [15]
Round 23: sc in all 15 st [15]
Round 24: dec, sc in next 13 st [14]
Round 25: sc in all 14 st [14]
Round 26: dec, sc in next 12 st [13]
Round 27: sc in all 13 st [13]
Don’t stuff the ear.
Flatten the ear and sc in the next 6 st through both layers to close the opening. Fasten off, leaving a long tail for sewing.
LEG (make 4, start in off-white yarn)
Ch 8. Stitches are worked around both sides of the foundation chain.
Round 1: skip first ch on the hook, sc in next 6 ch, 3 sc in next ch. Continue on the other side of the foundation chain, sc in next 5 ch, inc in next ch [16]
Round 2: inc in next st, sc in next 5 st, inc in next 3 st, sc in next 5 st, inc in next 2 st [22]
Round 3: sc in next st, inc in next st, sc in next 5 st, (hdc in next st, 2 hdc in next st) repeat 3 times, sc in next 5 st, {sc in next st, inc in next st} repeat 2 times [28]
Round 4 – 7: sc in all 28 st [28]
Round 8: sc in next 8 st, dec 6 times, sc in next 8 st (mark the 11th and 12th st, these indicate the front center of each leg) [22]
Round 9: sc in next 7 st, dec 4 times, sc in next 7 st [18]
Round 10: (sc in next 4 st, dec) repeat 3 times [15]
Round 11: sc in all 15 st [15]
Change to light brown yarn.
Round 12 – 13: sc in all 15 st [15]
Round 14: {sc in next 4 st, inc in next st} repeat 3 times (mark the last st for each leg, this will be important for joining the legs later) [18]
On 3 legs, Slst in the next st and fasten off. Don’t weave the yarn ends in just yet. Stuff each leg firmly with fiberfill. The 4th leg will be the right hind leg. Mark the 12th stitch on the 4th leg. Don’t fasten off, but continue working the body.
BODY (in light brown yarn)
Round 1: sc in next 3 st, ch 3, insert hook in the marked last stitch of round 14 on what will be the left hind leg, sc in next 10 st around the left hind leg, ch 11, insert hook in 4th stitch after the marked last stitch on round 14 on what will be the left front leg (make sure the chain isn’t turned), sc in next 10 st around the left front leg, ch 3, insert hook in 9th st of round 14 on what will be the right front leg, sc in next 10 st around the right front leg, ch 11, insert hook into 12th stitch of round 14 of the right hind leg (make sure the chain isn’t turned), sc in next 7 st around the right hind leg [68]
Round 2: sc in next 3 st, sc into edge of next 3 ch, sc in next 9 st, inc in next st, sc into edge of next 11 ch, inc in next st, sc in next 9 st, sc into edge of next 3 ch, sc in next 9 st, inc in next st, sc into edge of next 11 ch, inc in next st, sc in next 6 st [72]
Round 3 – 4: sc in all 72 st [72]
Round 5: sc in next 2 st, dec, {sc in next 4 st, dec} repeat 3 times, sc in next 36 st, {sc in next 4 st, dec} repeat 2 times, sc in next 2 st [68]
Round 6 – 7: sc in all 66 st [66]
Round 8: {sc in next 3 st, dec} repeat 4 times, sc in next 36 st, {sc in next 3 st, dec} repeat 2 times [60]
Round 9: sc in all 60 st [60]
Continue working on the bottom of the body with a new ball of yarn. Crochet in rows. Hold the puppy’s body upside down. Pull up a loop of light brown yarn of a new ball of yarn in the first unworked edge of ch 11 (used to connect the right hind leg to the right front leg). Start at the ch closest to the right hind leg. Row 1: start in the same st in which you joined the yarn, sc in the unworked edge of next 11 ch, ch 1, turn [11]
Row 2: skip first ch on the hook, sc in next 11 st, ch 1, turn [11]
Row 3: skip first ch on the hook, sc in next 11 st, ch 6, turn [17]
Row 4: skip first ch on the hook, sc in next 5 ch, sc in next 11 st, ch 6, turn [17]
Row 5: skip first ch on the hook, sc in next 5 ch, sc in next 16 st, ch 1, turn [21]
Row 6: skip first ch on the hook, sc in next 21 st, ch 1, turn [21]
Row 7: skip first ch on the hook, sc in next 16 st, ch 1, turn [16]
Row 8 – 9: skip first ch on the hook, sc in next 11 st, ch 1, turn [11]
Row 10: skip first ch on the hook, sc in next 11 st [11]
Fasten off, leaving a long tail for sewing. Weave in the starting yarn tail. Using the yarn tail left on row 10 of the bottom of the body and the yarn tails left on each leg and sew the bottom of the body to the unused stitches on round 1 of the body.
Continue working the top of the body where you left off at the end of round 9, in light brown yarn. Crochet in rounds.
Round 10: dec, sc in next 6 st, dec, sc in next 5 st, dec, sc in next 36 st, dec, sc in next 5 st [56]
Round 11: dec, sc in next 4 st, {dec, sc in next 5 st} repeat 2 times, sc in next 29 st, dec, sc in next 5 st [52]
Round 12: sc in next 6 st, dec, sc in next 7 st, dec, sc in next 24 st, dec, sc in next 7 st, dec [48]
Round 13: sc in next 6 st, dec, sc in next 7 st, dec, sc in next 20 st, dec, sc in next 7 st, dec [44]
Round 14: dec, sc in next 3 st, {dec, sc in next 3 st} repeat 2 times, sc in next 23 st, dec, sc in next 4 st [40]
Round 15: sc in next 4 st, {dec, sc in next 3 st} repeat 2 times, sc in next 16 st, {sc in next 3 st, dec} repeat 2 times [36]
Round 16: dec, sc in next 2 st, dec, sc in next 3 st, dec, sc in next 2 st, dec, sc in next 12 st, dec, sc in next 2 st, dec, sc in next 3 st [30]
Round 17: sc in all 30 st [30]
Round 18: dec, {sc in next st, dec} repeat 3 times, sc in next 12 st, dec, sc in next st, dec, sc in next 2 st [24]
Stuff the body [especially the parts where the legs join the body] firmly with fiberfill.
Rnd 19: hdc in next 6 st, dec, sc in next 2 st, dec, sc in next 3 st, dec, sc in next 2 st, dec, hdc in next 3 st [20]
Rnd 20: hdc in next 6 st [6] Leave the remaining stitches unworked.
Finish stuffing the body. Slst in next st. Fasten off, leaving a long tail for sewing.
PATCH 1 (in dark brown yarn)
Round 1: start 6 sc in a magic ring [6]
Round 2: inc in all 6 st [12]
Round 3: sc in next st, 2 hdc in next st, dc in next st, 2 hdc in next st, slst in next st, 2 hdc in next st, Slst in next st, 2 hdc in next st, dc in next st, dc in next st, 2 dc in next st, 2 dc in next st, dc in next st, Slst in next st [17]
Fasten off, leaving a long tail for sewing.
PATCH 2 (in dark brown yarn)
Round 1: start 6 sc in a magic ring [6]
Round 2: inc in all 6 st [12]
Round 3: {sc in next st, inc in next st} repeat 6 times [18]
Round 4: slst in next 2 st, hdc + dc in next st, 2 tr in next st, dc in next 2 st, hdc in next 2 st, slst in next 2 st, 2 hdc in next st, 2 dc in next st, hdc in next st, sc in next st, hdc in next st, 2 dc in next st, hdc in next st, sc in next st, slst in next st [24]
Fasten off, leaving a long tail for sewing.
PATCH 3 (in off-white yarn)
Round 1: start 6 sc in a magic ring [6]
Round 2: inc in all 6 st [12]
Round 3: {sc in next st, inc in next st} repeat 6 times [18]
Round 4: hdc in next st, dc in next st, 2 dc in next st, 2 tr in next st, dc in next st, hdc in next st, inc in next st, hdc in next st, 2 dc in next st, tr in next st, dc in next st, 2 hdc in next st, slst in next st, hdc in next st, 2 dc in next st, hdc in next st, slst in next st, sc in next st, slst in next st [25]
Fasten off, leaving a long tail for sewing.
TAIL (in light brown yarn)
Rnd 1: start 6 sc in a magic ring [6]
Rnd 2: {sc in next st, inc in next st} repeat 3 times [9]
Rnd 3 – 6: sc in all 9 st [9]
Slst in next st. Fasten off, leaving a long tail for sewing. Stuff the tail with fiberfill.
BOW (in dark blue yarn)
Back piece
Ch 8. Stitches are worked around both sides of the foundation chain.
Round 1: skip first ch on the hook, sc in next 6 ch, 4 sc in next ch. Continue on the other side of the foundation chain, sc in next 5 ch, 3 sc in next ch [18]
Round 2: {sc in next 7 st, sc + hdc + dc in next st, dc + hdc + sc in next st} repeat 2 times [26]
Round 3: sc in next 8 st, 5 hdc in next st, sc in next 2 st, 5 hdc in next st, sc in next 9 st, 5 hdc in next st, sc in next 2 st, 5 hdc in next st, sc in next st [42]
Round 4: next st, 2 dc in next st, 3 dc in next st, 2 dc in next st, 2 hdc in next st), sc in next 9 st, repeat the instructions between brackets, sc in next st (mark the last st) [66]
Fasten off and weave in the yarn tail.
Front piece
Ch 8. Stitches are worked around both sides of the foundation chain.
Round 1 – 3: repeat the instructions for the back piece.
Round 4: sc in next 8 st, (2 hdc in next st, 2 dc in next st, 3 dc in next st, 2 dc in next st, 2 hdc in next st, slst in next 2 st, 2 hdc in next st, 2 dc in next st, 3 dc in next st, 2 dc in next st, 2 hdc in next st), sc in next 9 st, repeat instructions between brackets [65]
Don’t fasten off.
Joining the front and back pieces
Hold the wrong sides of the front and back pieces together.
The edges you finished in round 4 should be placed together to align the bow. Use the last marked stitch of round 4 on the back piece as well as the hdc and dc “patterning” in round 4 as an alignment guide. Weave in all the yarn ends on the wrong side of the pieces, except for the end yarn tail of round 4 of the front piece.
To join the pieces of the bow, sc in next 66 st around the bow through both the front and back pieces. Stuff the two ends of the bow firmly with fiberfill before closing, but leave the center portion unstuffed.
Crochet an extra 5 sc.
Fasten off, leaving a long yarn tail. Wind the yarn tail around the middle of the bow, pinching it together. Fasten off and weave in the yarn ends.
CENTER OF BOW (in dark blue yarn)
Leave a long starting yarn tail. Ch 15. Crochet in rows.
Row 1: skip first ch on the hook, sc in next 14 ch, ch 1, turn [14]
Row 2: skip first ch on the hook, sc in next 14 st, ch 1, turn [14]
Row 3: skip first ch on the hook, sc in next 14 st [14]
Fasten off, leaving a long yarn tail. Wrap the center around the middle of the bow and sew the short edges together on the back. Leave long yarn tails for sewing.
NECK BAND (in dark blue yarn)
Leave a long starting yarn tail. Ch 30. Crochet in rows.
Row 1: skip first ch on the hook, sc in next 29 ch, ch 1, turn [29]
Row 2: skip first ch on the hook, sc in next 29 st, ch 1, turn [29]
Row 3: skip first ch on the hook, sc in next 29 st [29]
Fasten off, leaving a long yarn tail.
ASSEMBLY
- Sew the stripe to the head. The wider end of the stripe is the top end and should fall between rounds 1 and 2 at the back of the head. The narrower end of the stripe should be centered between the eyes. There should be approximately 3 stitches between the white stripe and the inside edge of each eye.
- Sew the muzzle to the head. The yarn tail has been brought out between rounds 10 and 11 at the back of the muzzle . The top of the muzzle should fall between rounds 14 and 15 of the head, centered between the eyes and over the stripe.
- Sew the flat edge of the ears between rounds 9 and 10 of the head. The front corners of the ears should be at approximately 5 stitches from the stripe.
- Pin the head to the body, giving the head a slight tilt if you wish. Sew the opening of the body over rounds 1 to 4 of the base of the head.
- Sew the patches to the body, you can position them as you wish. In the pictured example, Patch 1 was sewn over rounds 6 to 11 on the left front side, Patch 2 over rounds 4 to 13 on the right side and Patch 3 over rounds 7 to 14 of the left center back .
- Sew the tail over rounds 4 to 6 of the body, between the hind legs .
- Put the neck band around the neck and sew the short edges together. Pass a few stitches through the body, so that the neck band does not swivel around.
- Sew the bow to the neck band.
The Yuti
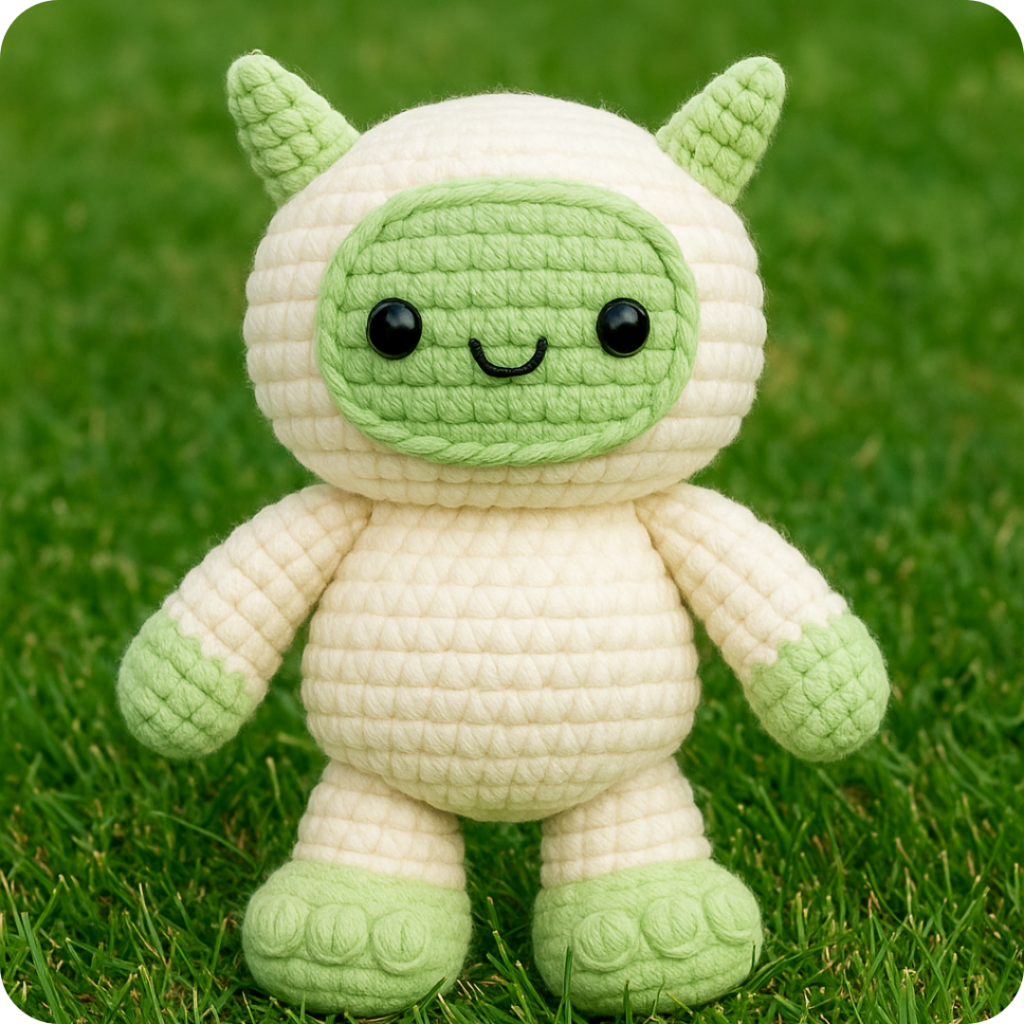

The Yeti, also known as the Abominable Snowman, is a mythical creature said to inhabit the snowy mountains of the Himalayas. Often described as a large, ape-like being covered in white or gray fur, the Yeti has captured the imagination of adventurers and folklore enthusiasts for centuries. While no scientific evidence has confirmed its existence, stories of sightings and mysterious footprints continue to fuel fascination and debate. The Yeti remains a powerful symbol of nature’s mysteries and the enduring allure of the unknown.
Size:
7 inches tall x 6 inches wide
Materials:
- Caron One Pound worsted (100% acrylic; 812 yards (742 m) / 454 g) in White
- Caron One Pound in Pale Green
- Caron One Pound in Black (small amount for mouth)
- US 7 (4.5 mm) crochet hook
- 14 mm black safety eyes
- Polyester fiberfill
- Tapestry needle
- Stitch markers
- Scissors
Stitches Used:
- Magic ring
- Single crochet (sc)
- Double crochet (dc)
- Popcorn stitch (pc)
- Increase (inc)
- Invisible decrease (dec)
Head and Body
Make 1 in White
Make a magic ring.
Round 1: Sc 6 in magic ring. [6 sts]
Round 2: Inc in each st around. [12 sts]
Round 3: *Sc in the next st, inc in the next st; rep from * 5 more times. [18 sts]
Round 4: *Sc in the next 2 sts, inc in the next st; rep from * 5 more times. [24 sts]
Round 5: *Sc in the next 3 sts, inc in the next st; rep from * 5 more times. [30 sts]
Round 6: *Sc in the next 4 sts, inc in the next st; rep from * 5 more times. [36 sts]
Round 7: *Sc in the next 5 sts, inc in the next st; rep from * 5 more times. [42 sts]
Rounds 8–15: Sc in each st around. [8 rounds @ 42 sts]
Round 16: *Sc in the next 5 sts, dec; rep from * 5 more times. [36 sts]
Round 17: *Sc in the next 4 sts, dec; rep from * 5 more times. [30 sts]
Round 18: *Sc in the next 3 sts, dec; rep from * 5 more times. [24 sts]
You’ve now finished the head and will begin increasing to make the body.
Round 19: *Sc in the next 3 sts, inc in the next st; rep from * 5 more times. [30 sts]
Round 20: *Sc in the next 4 sts, inc in the next st; rep from * 5 more times. [36 sts]
Rounds 21–24: Sc in each st around. [4 rounds @ 36 sts]
Round 25: *Sc in the next 5 sts, inc in the next st; rep from * 5 more times. [42 sts]
Rounds 26–30: Sc in each st around. [5 rounds @ 42 sts]
Stuff the head fully and begin stuffing the shoulders; continue stuffing as you work the remaining rounds.
Round 31: *Sc in the next 5 sts, dec; rep from * 5 more times. [36 sts]
Round 32: *Sc in the next 4 sts, dec; rep from * 5 more times. [30 sts]
Round 33: *Sc in the next 3 sts, dec; rep from * 5 more times. [24 sts]
Round 34: *Sc in the next 2 sts, dec; rep from * 5 more times. [18 sts]
Round 35: *Sc in the next st, dec; rep from * 5 more times. [12 sts]
Finish stuffing the body before working the last round.
Round 36: Dec in each pair of st around. [6 sts]
Fasten off the yarn, leaving a short tail of 6 to 8 inches for closing the body. Add any extra stuffing before using a tapestry needle to weave the tail through the front loops of the last round. Pull the tail tight to close the body and weave in the end, then set aside.
Face
Make 1 in Pale Green
Make a magic ring.
Round 1: Sc 6 in magic ring. [6 sts]
Round 2: *Sc 3 in the next st, inc in the next st, sc in the next st; rep from * 1 more time. [12 sts]
Round 3: Sc in the next st, inc in the next 3 sts, sc in the next 3 sts, inc in the next 3 sts, sc in the next 2 sts. [18 sts]
Round 4: Sc in the next st, *sc in the next st, inc in the next st; rep from * 2 more times; sc in the next 3 sts, *sc in the next st, inc in the next st; rep from * 2 more times; sc in the next 2 sts. [24 sts]
Round 5: Sc in the next 2 sts, *sc in the next st, inc in the next st; rep from * 2 more times; sc in the next 6 sts, *sc in the next st, inc in the next st; rep from * 2 more times; sc in the next 4 sts. [30 sts]
Round 6: Sc in the next 3 sts, *sc in the next st, inc in the next st; rep from * 2 more times; sc in the next 9 sts, *sc in the next st, inc in the next st; rep from * 2 more times; sc in the next 6 sts. [36 sts]
Fasten off the yarn, leaving a long tail of 20 to 22 inches for attaching to the head. With the oval positioned so the longer side is horizontal and the shorter side is vertical, insert 14 mm safety eyes between Rounds 4 and 5 on either side of the face so they line up with the magic ring. Find the center point between the eyes and count 4 rounds down to locate where the center of the smile should be. Take a medium strand of Black yarn and use a tapestry needle to embroider the mouth by making 2 diagonal lines that meet in the center to form a wide V. Set aside the face.
Horns
Make 2 in Pale Green
Make a magic ring.
Round 1: Sc 4 in magic ring. [4 sts]
Round 2: Sc in the next st, inc in the next 2 sts, sc in the next st. [6 sts]
Round 3: Sc in each st around. [6 sts]
Round 4: Sc in the next 2 sts, inc in the next 2 sts, sc in the next 2 sts. [8 sts]
Round 5: Sc in each st around. [8 sts]
Fasten off the yarn, leaving a medium tail of 14 to 16 inches for attaching to the head, then set aside.
Arms
Make 2
Make a magic ring in Pale Green.
Round 1: Sc 6 in magic ring. [6 sts]
Round 2: Inc in each st around. [12 sts]
Round 3: Sc in each st around. [12 sts]
On the last st of Round 3, change to White.
Rounds 4–7: Sc in each st around. [4 rounds @ 12 sts]
Round 8: *Sc in the next 4 sts, dec; rep from * 1 more time. [10 sts]
Fasten off the yarn, leaving a medium tail. Using the handle end of your hook, add a small amount of stuffing to the bottom half of the arm. Press the top of the arm flat and stitch it closed, leaving the tail for attaching to the body, then set aside.
Feet
Make 2 in Pale Green
Make a magic ring.
Round 1: Sc 6 in magic ring. [6 sts]
Round 2: *Sc 3 in the next st, inc in the next st, sc in the next st; rep from * 1 more time. [12 sts]
Round 3: Sc in the next st, inc in the next 3 sts, sc in the next 3 sts, inc in the next 3 sts, sc in the next 2 sts. [18 sts]
Round 4: Sc in the next st, *sc in the next st, inc in the next st; rep from * 2 more times; sc in the next 3 sts, *sc in the next st, inc in the next st; rep from * 2 more times; sc in the next 2 sts. [24 sts]
Round 5: Sc in each st around. [24 sts]
Round 6: Sc in the next 2 sts, *sc in the next st, 5dc pc in the next st; rep from * 3 more times; sc in the next 14 sts. [24 sts]
Round 7: Sc in each st around. [24 sts]
Round 8: Dec in the next 6 pairs of st, sc in the next 12 sts. [18 sts]
Round 9: *Sc in the next st, dec; rep from * 5 more times. [12 sts]
Fasten off the yarn, leaving a medium tail for attaching to the body, then set aside.
Assembly
Gather all the pieces, a tapestry needle, and a pair of scissors.
- Attach the face to the front of the head so that the bottom of the face is 1 round up from the neck (the narrowest part of the body) and the top of the face is 6 rounds down from the top of the head.
- Stuff the horns and attach them to the top of the head. The curve of the horn should point toward the center, and the inside edge of the base of each horn should be 4 rounds from the center.
- Attach the arms at the shoulder, the round below the narrowest point of the neck. They should be attached on a slight diagonal, with the inside corner of the arm higher than the outside so that the arms are angled slightly forward.
- Stuff the feet, then set the Yeti body upright on a flat surface. The heel of the foot should rest on the flat surface with the toes straight up. Line up the foot with the body and attach it where the last round of the foot meets the body. Repeat these steps on the other side with second leg. The feet should be around 5 sts apart and centered on the front of the body.
Want an Offline Copy?
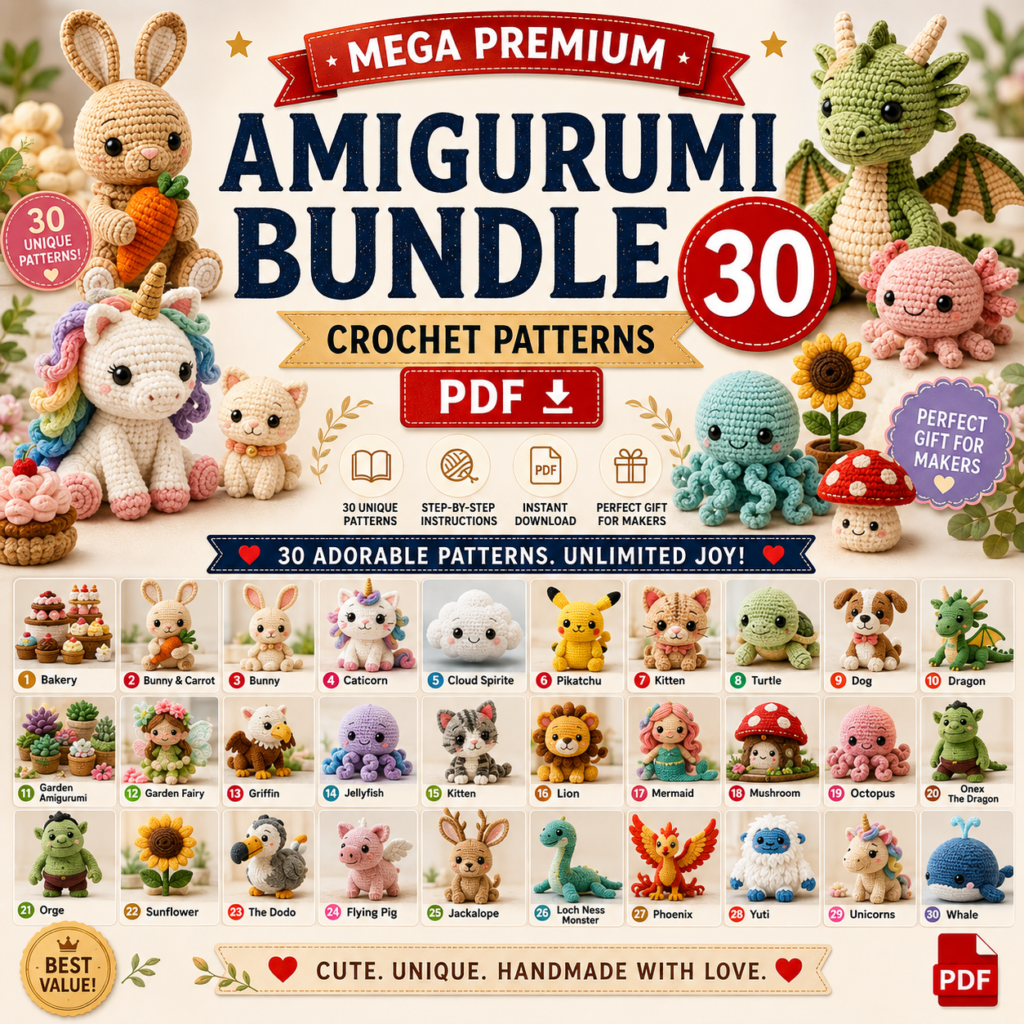
If you prefer to crochet on the go without relying on an internet connection, you can grab the complete, ad-free printable PDF version of these patterns! Keep it saved right on your device, print it out, or take it with you anywhere.
30-in-1 Amigurumi Mega Bundle
- 30 Unique Patterns: Endless variety for your crochet projects.
- Instant PDF Download: Get started right away with clear, step-by-step instructions.
- Perfect for Makers: Designed with detailed photo guides to ensure beautiful results every time.
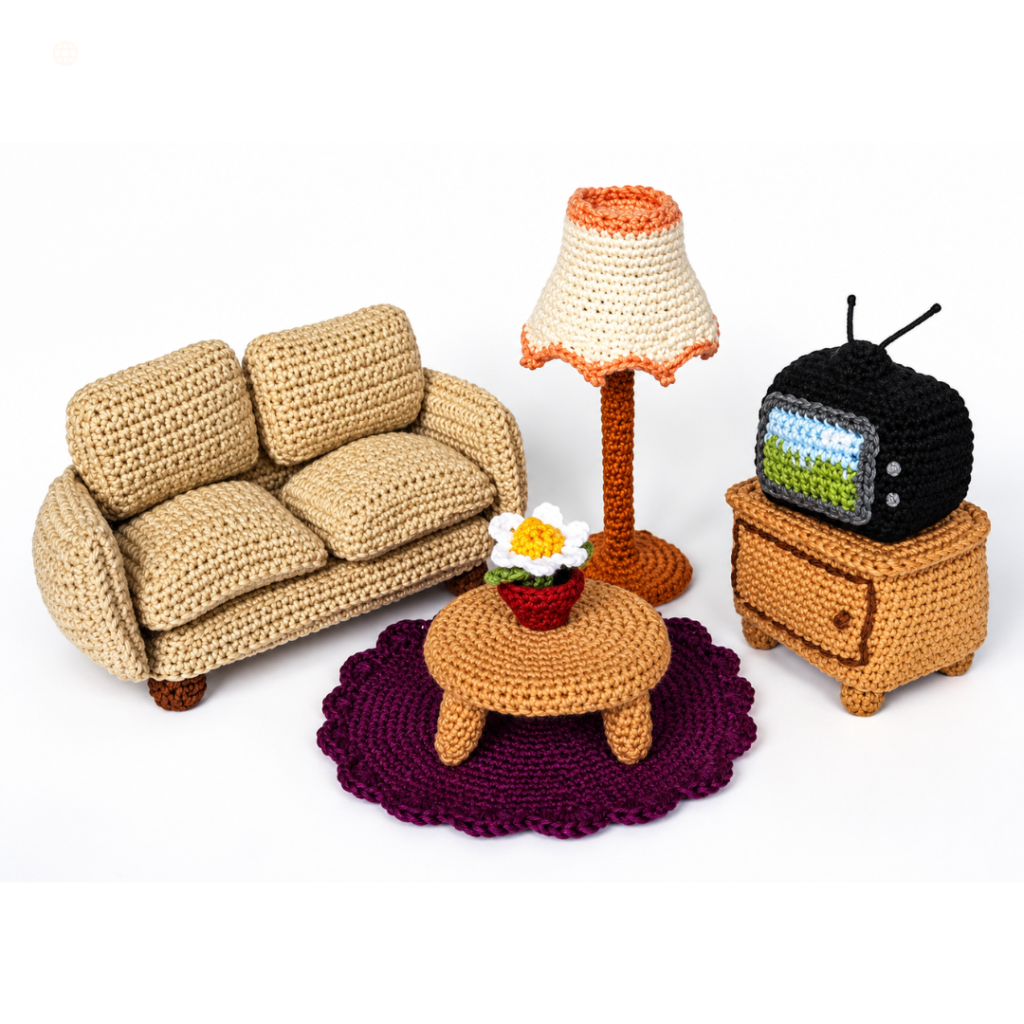
5 Quick Crochet Mini Living Room Projects You Can Make in a Day