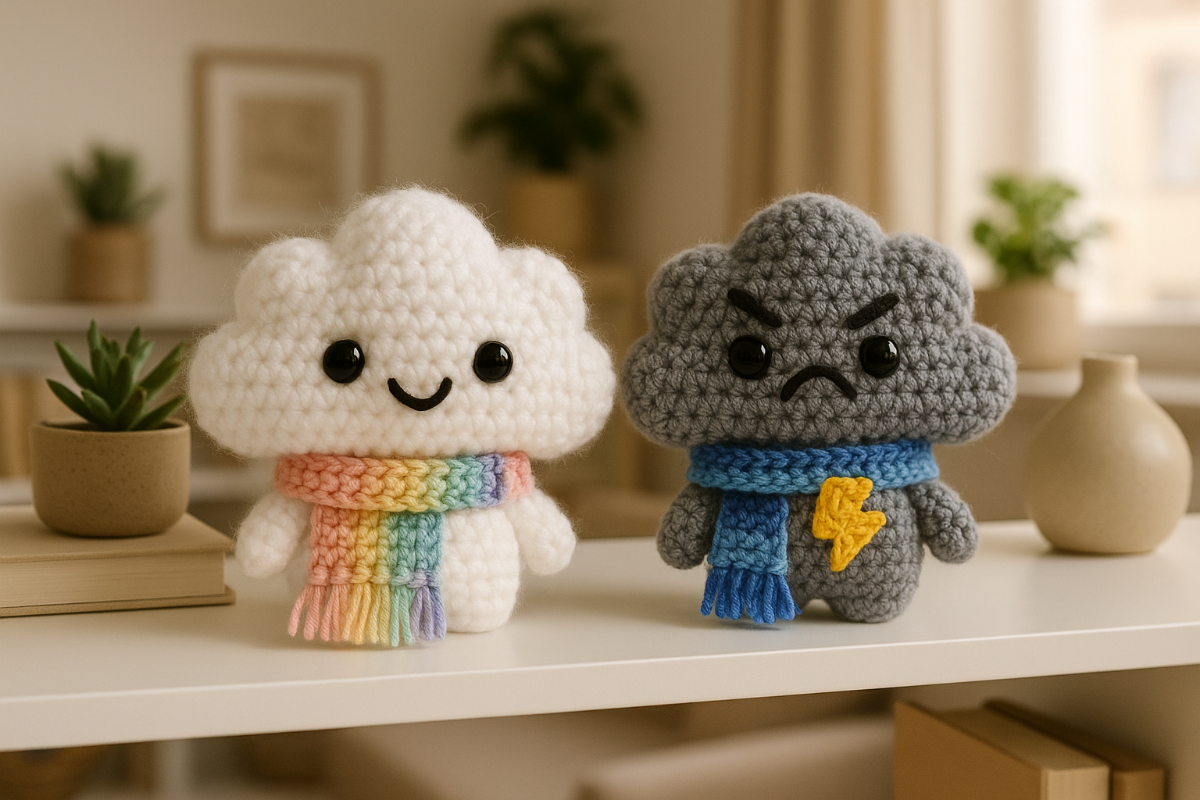
Size: 7 inches tall x 5½ inches wide
Materials:
Iris the Rainbow Cloud Sprite
- Caron One Pound worsted (100% acrylic; 812 yards (742 m) / 454 g) in White
- Caron One Pound in Light Pink
- Caron One Pound in Peach
- Caron One Pound in Cream
- Caron One Pound in Pale Green
- Caron One Pound in Sky Blue
- Caron One Pound in Lilac
- Caron One Pound in Black (small amount for mouth)
Gale the Stormy Cloud Sprite
- Caron One Pound worsted (100% acrylic; 812 yards (742 m) / 454 g) in Medium Gray Mix
- Caron One Pound in Sky Blue
- Caron One Pound in Royalty
- Caron One Pound in Yellow
- Caron One Pound in Black (small amount for mouth)
- US 7 (4.5 mm) crochet hook
- 14 mm black safety eyes
- Polyester fiberfill
- Tapestry needle
- Stitch markers
- Scissors
Stitches Used:
- Magic ring
- Chain (ch)
- Single crochet (sc)
- Increase (inc)
- Invisible decrease (dec)
- Lark’s head knot
1. Cloud Head
Make 1 in either White or Medium Gray Mix
Make a magic ring.
Round 1: Sc 6 in magic ring. [6 sts]
Round 2: Inc in each st around. [12 sts]
Round 3: *Sc in the next st, inc in the next st; rep from * 5 more times. [18 sts]
Round 4: *Sc in the next 2 sts, inc in the next st; rep from * 5 more times. [24 sts]
Round 5: *Sc in the next 3 sts, inc in the next st; rep from * 5 more times. [30 sts]
Rounds 6–9: Sc in each st around. [4 rounds @ 30 sts]
We’ll now begin the cloud shaping using decreases and increases.
Round 10: Sc in the next st, dec in the next 6 pairs of st, sc in the next 17 sts. [24 sts]
Round 11: Sc in the next st, inc in the next 6 sts, sc in the next 17 sts. [30 sts]
Round 12: Sc in the next st, *sc in the next st, inc in the next st; rep from * 5 more times; sc in the next 17 sts. [36 sts]
Rounds 13–17: Sc in each st around. [5 rounds @ 36 sts]
We’ll now do the same shaping, but in reverse order, so the top of the cloud head is symmetrical. Because we’re crocheting in a spiral, the stitches have shifted a bit, so look out for the extra st at the beginning of the round that will help keep everything in line.
Round 18: Sc in the next 2 sts, *sc in the next st, dec; rep from * 5 more times; sc in the next 16 sts. [30 sts]
Round 19: Sc in the next 2 sts, dec in the next 6 pairs of st, sc in the next 16 sts. [24 sts]
Round 20: Sc in the next 2 sts, inc in the next 6 sts, sc in the next 16 sts. [30 sts]
Rounds 21–24: Sc in each st around. [4 rounds @ 30 sts]
The shaping we did created 2 small creases in the top of the cloud head. Locate the deepest part of the crease and insert 14 mm safety eyes 1 st down and 1 round to the outside of this crease.
Round 25: *Sc in the next 3 sts, dec; rep from * 5 more times. [24 sts]
Begin stuffing the cloud head and continue stuffing as you work the next few rounds.
Round 26: *Sc in the next 2 sts, dec; rep from * 5 more times. [18 sts]
Round 27: *Sc in the next st, dec; rep from * 5 more times. [12 sts]
Round 28: Dec in each pair of st around. [6 sts]
Fasten off the yarn, leaving a small tail of 6 to 8 inches. Add any extra stuffing, then use a tapestry needle to weave the tail through the front loops of the last round. Pull the tail tight to close the cloud head and weave in the end, then set aside.
2. Legs and Body
Make 2 legs in either White or Medium Gray Mix
Make 1 body in either White or Medium Gray Mix
We’ll be working our way from the legs up for this part of the pattern, crocheting 2 separate legs and connecting them to form the body.
Leg 1
Make a magic ring.
Round 1: Sc 6 in magic ring. [6 sts]
Round 2: *Sc in the next 2 sts, inc; rep from * 1 more time. [8 sts]
Round 3: *Sc in the next 3 sts, inc; rep from * 1 more time. [10 sts]
Round 4: *Sc in the next 4 sts, inc; rep from * 1 more time. [12 sts]
Round 5: Sc in each st around. [12 sts]
Fasten off the yarn, leaving a medium tail. (This tail will be used when you connect the legs to form the body). Insert a removable stitch marker into the last st from Round 5; this is where you will make your first st when it’s time to connect the legs. Set leg 1 aside.
Leg 2 and the Body
For leg 2, repeat the steps for leg 1 but do not fasten off the yarn.
Now that you have 2 separate legs, we need to join them together. Begin your round on leg 2.
Round 6: Sc in the next 6 st . . .
Pick up leg 1 and make your next st where you placed the removable stitch marker.
. . . sc in the next 12 sts . . .
You should now be back to the place where leg 1 and leg 2 are joined; finish the round on leg 2.
. . . sc in the next 6 sts. [24 sts]
Round 7: *Sc in the next 3 sts, inc; rep from * 5 more times. [30 sts]
Before we continue to the body, there’s one final step to joining the legs: You should notice that there is a small gap in between the legs. Take your tapestry needle and the medium tail that was left on leg 1 and stitch the gap closed, then secure the tail with a knot and trim the excess.
Back to the Body.
Rounds 8–10: Sc in each st around. [3 rounds @ 30 sts]
Round 11: *Sc in the next 3 sts, dec; rep from * 5 more times. [24 sts]
Rounds 12–15: Sc in each st around. [4 rounds @ 24 sts]
Round 16: *Sc in the next 2 sts, dec; rep from * 5 more times. [18 sts]
Round 17: *Sc in the next st, dec; rep from * 5 more times. [12 sts]
Fasten off the yarn, leaving a long tail of 20 to 22 inches for attaching the body to the cloud head, and set aside.
3. Arms
Make 2 in either White or Medium Gray Mix
Make a magic ring.
Round 1: Sc 6 in magic ring. [6 sts]
Round 2: *Sc in the next 2 sts, inc in the next st; rep from * 1 more time. [8 sts]
Rounds 3–6: Sc in each st around. [4 rounds @ 8 sts]
Round 7: *Sc in the next 2 sts, dec; rep from * 1 more time. [6 sts]
Round 8: Sc in each st around. [6 sts]
Fasten off the yarn, leaving a medium tail. Using the handle end of your hook, add a small amount of stuffing to the bottom half of the arm. Then use a tapestry needle to weave the tail through the front loops of the last round. Pull the tail tight to close the arm but do not trim the tail; set aside.
4. Rainbow Scarf
Make 1
Ch 41 in Light Pink.
Row 1: Sc in the second ch from the hook, sc in each ch across. [40 sts]
On the last st of Row 1, change to Peach, ch 1 and turn.
Row 2: Sc in each st across. [40 sts]
On the last st of Row 2, change to Cream, ch 1 and turn.
Row 3: Sc in each st across. [40 sts]
On the last st of Row 3, change to Pale Green, ch 1 and turn.
Row 4: Sc in each st across. [40 sts]
On the last st of Row 4, change to Sky Blue, ch 1 and turn.
Row 5: Sc in each st across. [40 sts]
On the last st of Row 5, change to Lilac, ch 1 and turn.
Row 6: Sc in each st across. [40 sts]
Fasten off the Lilac yarn, leaving a short tail. Trim all the other colors of yarn, leaving short tails; these will become part of the fringe.
5. Rainbow Scarf Fringe
Cut 4 strands of each color of yarn, roughly 3 inches in length. Attach 2 of the strands to the corresponding color on each end of the scarf, using a lark’s head knot: Fold the strand of yarn in half and use your crochet hook to pull the halfway point of the yarn strand through the edge of the scarf to make a small loop. Pull the two tail ends of that yarn strand through the small loop, then pull them tight to knot the strand in place. Repeat with all the colors, then trim the fringe to the desired length.
6. Lightning and Rain Scarf
Make 1
Scarf
Ch 41 in Sky Blue.
Row 1: Sc in the second ch from the hook, sc in each ch across. [40 sts]
On the last st of Row 1, change to Royalty, ch 1 and turn.
Row 2: Sc in each st across. [40 sts]
On the last st of Row 2, change to Sky Blue, ch 1 and turn.
Row 3: Sc in each st across. [40 sts]
On the last st of Row 3, change to Royalty, ch 1 and turn.
Row 4: Sc in each st across. [40 sts]
On the last st of Row 4, change to Sky Blue, ch 1 and turn.
Row 5: Sc in each st across. [40 sts]
Fasten off the yarn, leaving a short tail. Weave in all the loose ends from the color changes before attaching the lightning bolt.
7. Lightning Bolt
Make 1 in Yellow
The lightning bolt is made by chaining at the end of certain rows and not working all the way back to the beginning of the row, making a zigzag.
Ch 4.
Row 1: Sc in the second ch from the hook, sc in the next 2 ch, ch 3 and turn. [3 sts]
Row 2: Sc in the second ch from the hook, sc in the next ch, sc in the next st, ch 1 and turn. [3 sts]
Row 3: Sc in the next 3 sts, ch 3 and turn. [3 sts]
Row 4: Sc in the second ch from the hook, sc in the next ch, sc in the next st. [3 sts]
Fasten off the yarn, leaving a medium tail for attaching to the scarf. Use a tapestry needle to stitch the lightning bolt on one end of the scarf and set aside.
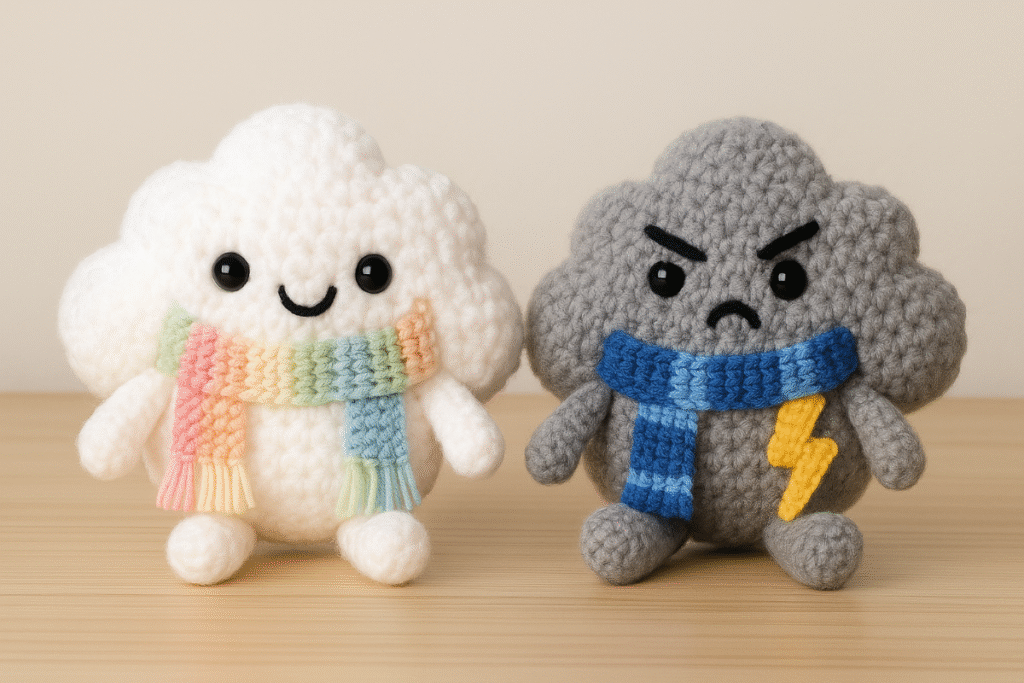
8. Assembly
Gather all the pieces, a tapestry needle, and a pair of scissors.
- Stuff the body and legs fully before attaching to the cloud head at the center bottom.
- Attach the arms on either side of the body, 2 rounds down from where the body meets the head. Angle the arms so they point slightly forward.
- Find the center point between the eyes and count 4 rounds down to locate where the center of the smile should be and 3 rounds down for the center of where the frown should be. Take a medium strand of Black yarn and use a tapestry needle to embroider the mouth by making 2 diagonal lines that meet in the center to form a wide V for the smile or upside-down V for the frown.
- Take a medium strand of Black yarn and use a tapestry needle to embroider the grumpy eyebrows for the Stormy Cloud Sprite. The eyebrow is a diagonal line that spans 2 rounds. The outside of the eyebrows should be around 3 sts up from the center of the eye and in line with the inside edge of the eye.
- If you’d like to attach your scarf to your Cloud Sprite, choose which side of the scarf you want in front and place it so the bottom of the scarf lines up with where the legs meet the body. Then wrap the scarf up over the shoulder, around the back of the neck, around the front of the body, and back over the shoulder. If you’d like to tack it down, take a medium strand of yarn in the color of the edge of the scarf that is closest to the center of the body and use a tapestry needle to make 1 or 2 small stitches connecting the scarf to the body. Repeat the process on the back of the body and weave in the ends.
